01、基础入门-SpringBoot2课程介绍
Spring Boot 2核心技术
Spring Boot 2响应式编程
学习要求
环境要求
学习资料
02、基础入门-Spring生态圈 Spring官网
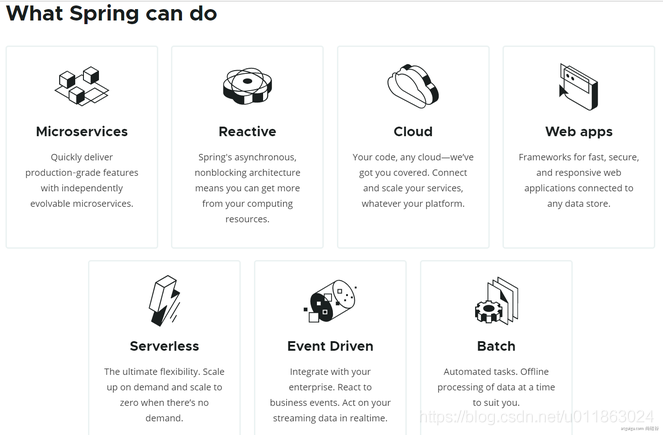
Spring能做什么 Spring的能力
Spring的生态 覆盖了:
web开发
数据访问
安全控制
分布式
消息服务
移动开发
批处理
……
Spring5重大升级
基于Java8的一些新特性,如:接口默认实现。重新设计源码架构。
为什么用SpringBoot
Spring Boot makes it easy to create stand-alone, production-grade Spring based Applications that you can “just run”.link
能快速创建出生产级别的Spring应用。
SpringBoot优点
Create stand-alone Spring applications
Embed Tomcat, Jetty or Undertow directly (no need to deploy WAR files)
Provide opinionated ‘starter’ dependencies to simplify your build configuration
Automatically configure Spring and 3rd party libraries whenever possible
Provide production-ready features such as metrics, health checks, and externalized configuration
Absolutely no code generation and no requirement for XML configuration
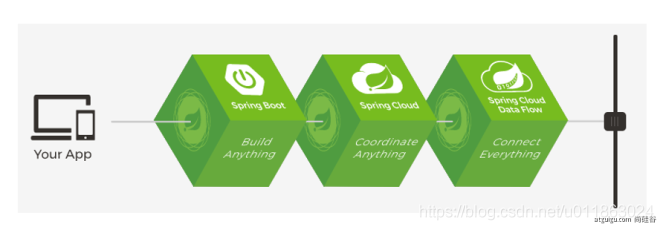
SpringBoot是整合Spring技术栈的一站式框架
SpringBoot是简化Spring技术栈的快速开发脚手架
SpringBoot缺点
人称版本帝,迭代快,需要时刻关注变化
封装太深,内部原理复杂,不容易精通
03、基础入门-SpringBoot的大时代背景 微服务
In short, the microservice architectural style is an approach to developing a single application as a suite of small services , each running in its own process and communicating with lightweight mechanisms, often an HTTP resource API. These services are built around business capabilities and independently deployable by fully automated deployment machinery. There is a bare minimum of centralized management of these services, which may be written in different programming languages and use different data storage technologies.——James Lewis and Martin Fowler (2014)
微服务是一种架构风格
一个应用拆分为一组小型服务
每个服务运行在自己的进程内,也就是可独立部署和升级
服务之间使用轻量级HTTP交互
服务围绕业务功能拆分
可以由全自动部署机制独立部署
去中心化,服务自治。服务可以使用不同的语言、不同的存储技术
分布式
分布式的困难
远程调用
服务发现
负载均衡
服务容错
配置管理
服务监控
链路追踪
日志管理
任务调度
……
分布式的解决
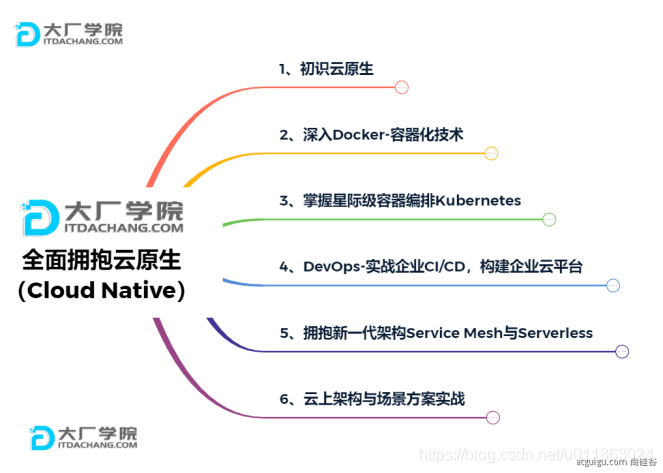
云原生 原生应用如何上云。 Cloud Native
上云的困难
服务自愈
弹性伸缩
服务隔离
自动化部署
灰度发布
流量治理
……
上云的解决
04、基础入门-SpringBoot官方文档架构
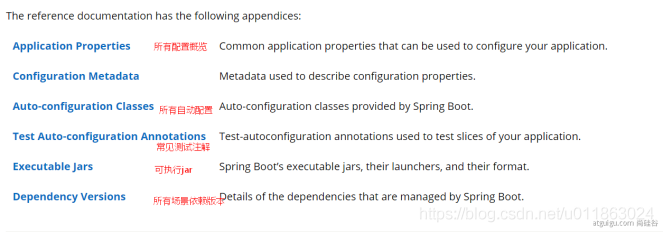
官网文档架构
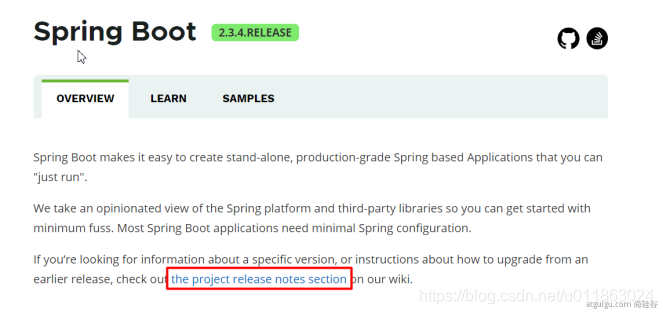
查看版本新特性
05、基础入门-SpringBoot-HelloWorld 系统要求
Java 8
Maven 3.3+
IntelliJ IDEA 2019.1.2
Maven配置文件 新添内容:
1 2 3 4 5 6 7 8 9 10 11 12 13 14 15 16 17 18 19 20 21 22 23 24 25 <mirrors > <mirror > <id > nexus-aliyun</id > <mirrorOf > central</mirrorOf > <name > Nexus aliyun</name > <url > http://maven.aliyun.com/nexus/content/groups/public</url > </mirror > </mirrors > <profiles > <profile > <id > jdk-1.8</id > <activation > <activeByDefault > true</activeByDefault > <jdk > 1.8</jdk > </activation > <properties > <maven.compiler.source > 1.8</maven.compiler.source > <maven.compiler.target > 1.8</maven.compiler.target > <maven.compiler.compilerVersion > 1.8</maven.compiler.compilerVersion > </properties > </profile > </profiles >
HelloWorld项目 需求:浏览发送/hello请求,响应 “Hello,Spring Boot 2”
创建maven工程 引入依赖 1 2 3 4 5 6 7 8 9 10 11 12 <parent > <groupId > org.springframework.boot</groupId > <artifactId > spring-boot-starter-parent</artifactId > <version > 2.3.4.RELEASE</version > </parent > <dependencies > <dependency > <groupId > org.springframework.boot</groupId > <artifactId > spring-boot-starter-web</artifactId > </dependency > </dependencies >
创建主程序 1 2 3 4 5 6 7 8 9 10 11 import org.springframework.boot.SpringApplication;import org.springframework.boot.autoconfigure.SpringBootApplication;@SpringBootApplication public class MainApplication { public static void main (String[] args) { SpringApplication.run(MainApplication.class, args); } }
编写业务 1 2 3 4 5 6 7 8 9 10 import org.springframework.web.bind.annotation.RequestMapping;import org.springframework.web.bind.annotation.RestController;@RestController public class HelloController { @RequestMapping("/hello") public String handle01 () { return "Hello, Spring Boot 2!" ; } }
运行&测试
运行MainApplication类
浏览器输入http://localhost:8888/hello,将会输出Hello, Spring Boot 2!。
设置配置 maven工程的resource文件夹中创建application.properties文件。
更多配置信息
打包部署 在pom.xml添加
1 2 3 4 5 6 7 8 <build > <plugins > <plugin > <groupId > org.springframework.boot</groupId > <artifactId > spring-boot-maven-plugin</artifactId > </plugin > </plugins > </build >
在IDEA的Maven插件上点击运行 clean 、package,把helloworld工程项目的打包成jar包,
打包好的jar包被生成在helloworld工程项目的target文件夹内。
用cmd运行java -jar boot-01-helloworld-1.0-SNAPSHOT.jar,既可以运行helloworld工程项目。
将jar包直接在目标服务器执行即可。
06、基础入门-SpringBoot-依赖管理特性
1 2 3 4 5 6 7 8 9 10 11 12 13 14 15 依赖管理 <parent > <groupId > org.springframework.boot</groupId > <artifactId > spring-boot-starter-parent</artifactId > <version > 2.3.4.RELEASE</version > </parent > 上面项目的父项目如下: <parent > <groupId > org.springframework.boot</groupId > <artifactId > spring-boot-dependencies</artifactId > <version > 2.3.4.RELEASE</version > </parent > 它几乎声明了所有开发中常用的依赖的版本号,自动版本仲裁机制
开发导入starter场景启动器
见到很多 spring-boot-starter-* : *就某种场景
只要引入starter,这个场景的所有常规需要的依赖我们都自动引入
更多SpringBoot所有支持的场景 其他第三方依赖 *-spring-boot-starter: 第三方为我们提供的简化开发的场景启动器。
1 2 3 4 5 6 7 所有场景启动器最底层的依赖 <dependency > <groupId > org.springframework.boot</groupId > <artifactId > spring-boot-starter</artifactId > <version > 2.3.4.RELEASE</version > <scope > compile</scope > </dependency >
无需关注版本号,自动版本仲裁
引入依赖默认都可以不写版本
引入非版本仲裁的jar,要写版本号。
可以修改默认版本号
查看spring-boot-dependencies里面规定当前依赖的版本 用的 key。
在当前项目里面重写配置,如下面的代码。
1 2 3 <properties > <mysql.version > 5.1.43</mysql.version > </properties >
IDEA快捷键:
ctrl + shift + alt + U:以图的方式显示项目中依赖之间的关系。alt + ins:相当于Eclipse的 Ctrl + N,创建新类,新包等。
07、基础入门-SpringBoot-自动配置特性
1 2 3 4 5 6 <dependency > <groupId > org.springframework.boot</groupId > <artifactId > spring-boot-starter-tomcat</artifactId > <version > 2.3.4.RELEASE</version > <scope > compile</scope > </dependency >
自动配好SpringMVC
引入SpringMVC全套组件
自动配好SpringMVC常用组件(功能)
自动配好Web常见功能,如:字符编码问题
SpringBoot帮我们配置好了所有web开发的常见场景
1 2 3 4 5 6 7 8 9 10 public static void main (String[] args) { ConfigurableApplicationContext run = SpringApplication.run(MainApplication.class, args); String[] names = run.getBeanDefinitionNames(); for (String name : names) { System.out.println(name); } }
默认的包结构
主程序所在包及其下面的所有子包里面的组件都会被默认扫描进来
无需以前的包扫描配置
想要改变扫描路径
@SpringBootApplication(scanBasePackages=”com.lun”)
@ComponentScan 指定扫描路径
1 2 3 4 5 @SpringBootApplication 等同于 @SpringBootConfiguration @EnableAutoConfiguration @ComponentScan("com.lun")
各种配置拥有默认值
默认配置最终都是映射到某个类上,如:MultipartProperties
配置文件的值最终会绑定每个类上,这个类会在容器中创建对象
……
08、底层注解-@Configuration(配置类)详解
1 2 3 4 5 6 7 8 9 10 11 12 13 14 15 16 17 18 19 20 21 22 23 24 25 26 27 @Configuration(proxyBeanMethods = false) public class MyConfig { @Bean public User user01 () { User zhangsan = new User ("zhangsan" , 18 ); zhangsan.setPet(tomcatPet()); return zhangsan; } @Bean("tom") public Pet tomcatPet () { return new Pet ("tomcat" ); } }
@Configuration测试代码如下:
1 2 3 4 5 6 7 8 9 10 11 12 13 14 15 16 17 18 19 20 21 22 23 24 25 26 27 28 29 30 31 32 33 34 35 36 37 @SpringBootConfiguration @EnableAutoConfiguration @ComponentScan("com.atguigu.boot") public class MainApplication { public static void main (String[] args) { ConfigurableApplicationContext run = SpringApplication.run(MainApplication.class, args); String[] names = run.getBeanDefinitionNames(); for (String name : names) { System.out.println(name); } Pet tom01 = run.getBean("tom" , Pet.class); Pet tom02 = run.getBean("tom" , Pet.class); System.out.println("组件:" +(tom01 == tom02)); MyConfig bean = run.getBean(MyConfig.class); System.out.println(bean); User user = bean.user01(); User user1 = bean.user01(); System.out.println(user == user1); User user01 = run.getBean("user01" , User.class); Pet tom = run.getBean("tom" , Pet.class); System.out.println("用户的宠物:" +(user01.getPet() == tom)); } }
最佳实战
配置 类组件之间无依赖关系 用Lite模式加速容器启动过程,减少判断
配置 类组件之间有依赖关系 ,方法会被调用得到之前单实例组件,用Full模式(默认)
lite 英 [laɪt] 美 [laɪt]
IDEA快捷键:
Alt + Ins:生成getter,setter、构造器等代码。Ctrl + Alt + B:查看类的具体实现代码。
09、底层注解-@Import导入组件 @Bean、@Component、@Controller、@Service、@Repository,它们是Spring的基本标签,在Spring Boot中并未改变它们原来的功能。
@ComponentScan 在07、基础入门-SpringBoot-自动配置特性 有用例。(组件扫描,可以在后面增加()指定扫描的包)
@Import({User.class, DBHelper.class})给容器中自动创建出这两个类型的组件 、默认组件的名字就是全类名(更愿意称为导入组件)
1 2 3 4 @Import({User.class, DBHelper.class}) @Configuration(proxyBeanMethods = false) public class MyConfig {}
测试类:
1 2 3 4 5 6 7 8 9 10 11 12 13 14 15 ConfigurableApplicationContext run = SpringApplication.run(MainApplication.class, args);String[] beanNamesForType = run.getBeanNamesForType(User.class); for (String s : beanNamesForType) { System.out.println(s); } DBHelper bean1 = run.getBean(DBHelper.class);System.out.println(bean1);
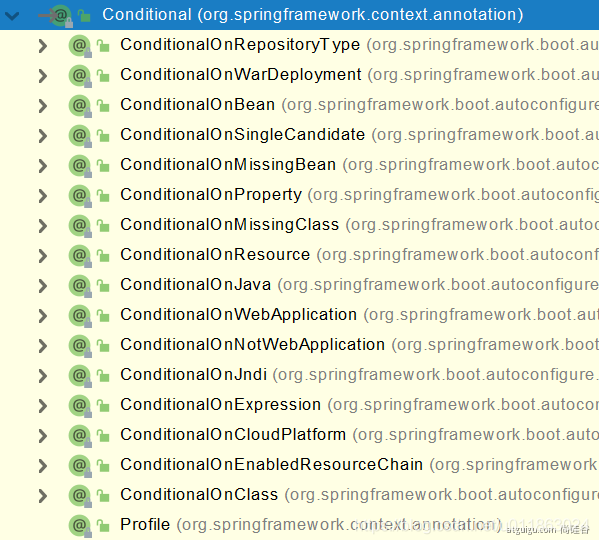
10、底层注解-@Conditional条件装配 条件装配:满足Conditional指定的条件,则进行组件注入
用@ConditionalOnMissingBean举例说明(无此bean,mycongfig下的配置才生效)
1 2 3 4 5 6 7 8 9 10 11 12 13 14 15 16 17 18 19 20 21 22 23 24 25 26 27 28 29 30 31 32 33 34 35 36 37 @Configuration(proxyBeanMethods = false) @ConditionalOnMissingBean(name = "tom") public class MyConfig { @Bean public User user01 () { User zhangsan = new User ("zhangsan" , 18 ); zhangsan.setPet(tomcatPet()); return zhangsan; } @Bean("tom22") public Pet tomcatPet () { return new Pet ("tomcat" ); } } public static void main (String[] args) { ConfigurableApplicationContext run = SpringApplication.run(MainApplication.class, args); String[] names = run.getBeanDefinitionNames(); for (String name : names) { System.out.println(name); } boolean tom = run.containsBean("tom" ); System.out.println("容器中Tom组件:" +tom); boolean user01 = run.containsBean("user01" ); System.out.println("容器中user01组件:" +user01); boolean tom22 = run.containsBean("tom22" ); System.out.println("容器中tom22组件:" +tom22); }
11、底层注解-@ImportResource导入Spring配置文件 比如,公司使用bean.xml文件生成配置bean,然而你为了省事,想继续复用bean.xml,@ImportResource粉墨登场。
1 2 3 4 5 6 7 8 9 10 11 12 <?xml version="1.0" encoding="UTF-8" ?> <beans ... "> <bean id ="haha" class ="com.lun.boot.bean.User" > <property name ="name" value ="zhangsan" > </property > <property name ="age" value ="18" > </property > </bean > <bean id ="hehe" class ="com.lun.boot.bean.Pet" > <property name ="name" value ="tomcat" > </property > </bean > </beans >
使用方法:
1 2 3 4 @ImportResource("classpath:beans.xml") public class MyConfig {... }
测试类:
1 2 3 4 5 6 7 8 9 public static void main (String[] args) { ConfigurableApplicationContext run = SpringApplication.run(MainApplication.class, args); boolean haha = run.containsBean("haha" ); boolean hehe = run.containsBean("hehe" ); System.out.println("haha:" +haha); System.out.println("hehe:" +hehe); }
12、底层注解-@ConfigurationProperties配置绑定 如何使用Java读取到properties文件中的内容,并且把它封装到JavaBean中,以供随时使用
传统方法:
1 2 3 4 5 6 7 8 9 10 11 12 13 public class getProperties { public static void main (String[] args) throws FileNotFoundException, IOException { Properties pps = new Properties (); pps.load(new FileInputStream ("a.properties" )); Enumeration enum1 = pps.propertyNames(); while (enum1.hasMoreElements()) { String strKey = (String) enum1.nextElement(); String strValue = pps.getProperty(strKey); System.out.println(strKey + "=" + strValue); } } }
Spring Boot一种配置配置绑定:
@ConfigurationProperties + @Component
假设有配置文件application.properties
1 2 mycar.brand =BYD mycar.price =100000
只有在容器中的组件,才会拥有SpringBoot提供的强大功能
1 2 3 4 5 @Component @ConfigurationProperties(prefix = "mycar") public class Car {... }
Spring Boot另一种配置配置绑定:
@EnableConfigurationProperties + @ConfigurationProperties
开启Car配置绑定功能
把这个Car这个组件自动注册到容器中
1 2 3 4 @EnableConfigurationProperties(Car.class) public class MyConfig {... }
1 2 3 4 @ConfigurationProperties(prefix = "mycar") public class Car {... }
13、自动配置【源码分析】-自动包规则原理 Spring Boot应用的启动类:
1 2 3 4 5 6 7 8 @SpringBootApplication public class MainApplication { public static void main (String[] args) { SpringApplication.run(MainApplication.class, args); } }
分析下@SpringBootApplication
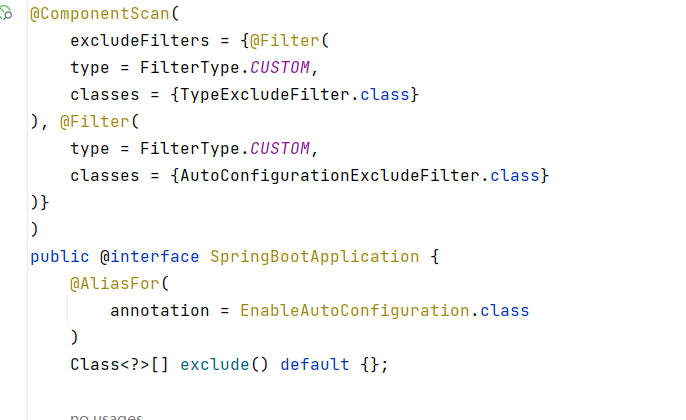
1 2 3 4 5 6 7 8 9 10 11 12 13 14 15 16 17 18 @Target(ElementType.TYPE) @Retention(RetentionPolicy.RUNTIME) @Documented @Inherited @SpringBootConfiguration @EnableAutoConfiguration @ComponentScan( excludeFilters = {@Filter( type = FilterType.CUSTOM, classes = {TypeExcludeFilter.class} ), @Filter( type = FilterType.CUSTOM, classes = {AutoConfigurationExcludeFilter.class} )} ) public @interface SpringBootApplication { ... }
重点分析@SpringBootConfiguration,@EnableAutoConfiguration,@ComponentScan。
@SpringBootConfiguration 1 2 3 4 5 6 7 8 9 10 @Target(ElementType.TYPE) @Retention(RetentionPolicy.RUNTIME) @Documented @Configuration public @interface SpringBootConfiguration { @AliasFor( annotation = Configuration.class ) boolean proxyBeanMethods () default true ; }
@Configuration代表当前是一个配置类。默认状态下该配置类是单实例的。
@ComponentScan
@ComponentScan 在07、基础入门-SpringBoot-自动配置特性 有用例。
@EnableAutoConfiguration 1 2 3 4 5 6 7 8 9 10 11 12 13 @Target(ElementType.TYPE) @Retention(RetentionPolicy.RUNTIME) @Documented @Inherited @AutoConfigurationPackage @Import(AutoConfigurationImportSelector.class) public @interface EnableAutoConfiguration { String ENABLED_OVERRIDE_PROPERTY = "spring.boot.enableautoconfiguration" ; Class<?>[] exclude() default {}; String[] excludeName() default {}; }
说明 @EnableAutoConfiguration由以下两个注解合成。@AutoConfigurationPackage,@Import(AutoConfigurationImportSelector.class)。
@AutoConfigurationPackage 标签名直译为:自动配置包,指定了默认的包规则。
1 2 3 4 5 6 7 8 9 10 11 @Target(ElementType.TYPE) @Retention(RetentionPolicy.RUNTIME) @Documented @Inherited @Import(AutoConfigurationPackages.Registrar.class) public @interface AutoConfigurationPackage { String[] basePackages() default {}; Class<?>[] basePackageClasses() default {}; }
研究一下导入的注册组件。
1 2 3 4 5 6 7 8 9 10 11 12 13 14 15 16 17 18 19 20 21 22 23 24 25 26 27 28 29 30 31 32 33 34 35 36 public abstract class AutoConfigurationPackages { ... static class Registrar implements ImportBeanDefinitionRegistrar , DeterminableImports { Registrar() { } public void registerBeanDefinitions (AnnotationMetadata metadata, BeanDefinitionRegistry registry) { AutoConfigurationPackages.register(registry, (String[])(new PackageImports (metadata)).getPackageNames().toArray(new String [0 ])); } public Set<Object> determineImports (AnnotationMetadata metadata) { return Collections.singleton(new PackageImports (metadata)); } } ... public static void register (BeanDefinitionRegistry registry, String... packageNames) { if (registry.containsBeanDefinition(BEAN)) { addBasePackages(registry.getBeanDefinition(BEAN), packageNames); } else { RootBeanDefinition beanDefinition = new RootBeanDefinition (BasePackages.class); beanDefinition.setRole(2 ); addBasePackages(beanDefinition, packageNames); registry.registerBeanDefinition(BEAN, beanDefinition); } } ... }
利用Registrar给容器中注册AutoConfigurationPackages下的一系列组件
将指定的一个包AutoConfigurationPackages下的所有组件注册进MainApplication所在包下
结合后面的Import注解将自动配置类加载进主程序所在的包下。
14、自动配置【源码分析】-初始加载自动配置类 @Import(AutoConfigurationImportSelector.class) 研究一下导入的这个AutoConfigurationImportSelector类
1 2 3 4 5 6 7 8 9 10 11 12 13 14 15 16 17 18 19 20 21 22 23 24 25 26 27 28 29 30 31 32 33 34 35 36 37 38 39 40 41 42 43 44 45 46 47 48 49 50 51 52 53 54 55 56 57 58 59 60 61 62 63 64 65 66 67 68 69 70 71 72 73 74 75 76 77 78 79 80 81 82 83 84 85 86 87 88 89 public class AutoConfigurationImportSelector implements DeferredImportSelector , BeanClassLoaderAware, ResourceLoaderAware, BeanFactoryAware, EnvironmentAware, Ordered { private static final AutoConfigurationEntry EMPTY_ENTRY = new AutoConfigurationEntry (); private static final String[] NO_IMPORTS = new String [0 ]; private static final Log logger = LogFactory.getLog(AutoConfigurationImportSelector.class); private static final String PROPERTY_NAME_AUTOCONFIGURE_EXCLUDE = "spring.autoconfigure.exclude" ; private ConfigurableListableBeanFactory beanFactory; private Environment environment; private ClassLoader beanClassLoader; private ResourceLoader resourceLoader; private ConfigurationClassFilter configurationClassFilter; public AutoConfigurationImportSelector () { } public String[] selectImports(AnnotationMetadata annotationMetadata) { if (!this .isEnabled(annotationMetadata)) { return NO_IMPORTS; } else { AutoConfigurationEntry autoConfigurationEntry = this .getAutoConfigurationEntry(annotationMetadata); return StringUtils.toStringArray(autoConfigurationEntry.getConfigurations()); } ... protected boolean isEnabled (AnnotationMetadata metadata) { if (getClass() == AutoConfigurationImportSelector.class) { return getEnvironment().getProperty(EnableAutoConfiguration.ENABLED_OVERRIDE_PROPERTY, Boolean.class, true ); } return true ; } ... protected AutoConfigurationEntry getAutoConfigurationEntry (AnnotationMetadata annotationMetadata) { if (!this .isEnabled(annotationMetadata)) { return EMPTY_ENTRY; } else { AnnotationAttributes attributes = this .getAttributes(annotationMetadata); List<String> configurations = this .getCandidateConfigurations(annotationMetadata, attributes); configurations = this .removeDuplicates(configurations); Set<String> exclusions = this .getExclusions(annotationMetadata, attributes); this .checkExcludedClasses(configurations, exclusions); configurations.removeAll(exclusions); configurations = this .getConfigurationClassFilter().filter(configurations); this .fireAutoConfigurationImportEvents(configurations, exclusions); return new AutoConfigurationEntry (configurations, exclusions); } } ... protected List<String> getCandidateConfigurations (AnnotationMetadata metadata, AnnotationAttributes attributes) { List<String> configurations = ImportCandidates.load(AutoConfiguration.class, this .getBeanClassLoader()).getCandidates(); Assert.notEmpty(configurations, "No auto configuration classes found in META-INF/spring/org.springframework.boot.autoconfigure.AutoConfiguration.imports. If you are using a custom packaging, make sure that file is correct." ); return configurations; } ... public static ImportCandidates load (Class<?> annotation, ClassLoader classLoader) { Assert.notNull(annotation, "'annotation' must not be null" ); ClassLoader classLoaderToUse = decideClassloader(classLoader); String location = String.format(LOCATION, annotation.getName()); Enumeration<URL> urls = findUrlsInClasspath(classLoaderToUse, location); List<String> importCandidates = new ArrayList <>(); while (urls.hasMoreElements()) { URL url = urls.nextElement(); importCandidates.addAll(readCandidateConfigurations(url)); } return new ImportCandidates (importCandidates); } }
利用getAutoConfigurationEntry(annotationMetadata);给容器中批量导入一些组件
调用List<String> configurations = getCandidateConfigurations(annotationMetadata, attributes)获取到所有需要导入到容器中的配置类
利用工厂加载 Map<String, List<String>> loadSpringFactories(@Nullable ClassLoader classLoader);得到所有的组件
(新版本是通过List<String> configurations = ImportCandidates.load(AutoConfiguration.class, this.getBeanClassLoader()).getCandidates();)来得到所有组件META-INF/spring.factories位置来加载一个文件。META-INF/spring.factories位置的文件spring-boot-autoconfigure-2.3.4.RELEASE.jar包里面也有META-INF/spring.factories
1 2 3 4 5 6 7 org.springframework.boot.autoconfigure.EnableAutoConfiguration =\ org.springframework.boot.autoconfigure.admin.SpringApplicationAdminJmxAutoConfiguration,\ org.springframework.boot.autoconfigure.aop.AopAutoConfiguration,\ ...
虽然我们127个场景的所有自动配置启动的时候默认全部加载,但是xxxxAutoConfiguration按照条件装配规则(@Conditional),最终会按需配置。
如AopAutoConfiguration类:
1 2 3 4 5 6 7 8 9 10 11 12 13 14 @Configuration( proxyBeanMethods = false ) @ConditionalOnProperty( prefix = "spring.aop", name = "auto", havingValue = "true", matchIfMissing = true ) public class AopAutoConfiguration { public AopAutoConfiguration () { } ... }
15、自动配置【源码分析】-自动配置流程 以DispatcherServletAutoConfiguration的内部类DispatcherServletConfiguration为例子:
1 2 3 4 5 6 7 8 9 @Bean @ConditionalOnBean(MultipartResolver.class) @ConditionalOnMissingBean(name = DispatcherServlet.MULTIPART_RESOLVER_BEAN_NAME) public MultipartResolver multipartResolver (MultipartResolver resolver) { return resolver; }
SpringBoot默认会在底层配好所有的组件,但是如果用户自己配置了以用户的优先 。
总结 :
SpringBoot先加载所有的自动配置类 xxxxxAutoConfiguration
每个自动配置类按照条件进行生效,默认都会绑定配置文件指定的值。(xxxxProperties里面读取,xxxProperties和配置文件进行了绑定)
生效的配置类就会给容器中装配很多组件
只要容器中有这些组件,相当于这些功能就有了
定制化配置
用户直接自己@Bean替换底层的组件
用户去看这个组件是获取的配置文件什么值就去修改。
xxxxxAutoConfiguration —> 组件 —> xxxxProperties里面拿值 —-> application.properties
16、最佳实践-SpringBoot应用如何编写
引入场景依赖
查看自动配置了哪些(选做)
自己分析,引入场景对应的自动配置一般都生效了
配置文件中debug=true开启自动配置报告。
Negative(不生效)
Positive(生效)
是否需要修改
参照文档修改配置项
官方文档 自己分析。xxxxProperties绑定了配置文件的哪些。
自定义加入或者替换组件
自定义器 XXXXXCustomizer;
……
17、最佳实践-Lombok简化开发 Lombok用标签方式代替构造器、getter/setter、toString()等鸡肋代码。
spring boot已经管理Lombok。引入依赖:
1 2 3 4 <dependency > <groupId > org.projectlombok</groupId > <artifactId > lombok</artifactId > </dependency >
IDEA中File->Settings->Plugins,搜索安装Lombok插件。
1 2 3 4 5 6 7 8 9 10 11 12 13 14 15 16 17 @NoArgsConstructor @Data @ToString @EqualsAndHashCode public class User { private String name; private Integer age; private Pet pet; public User (String name,Integer age) { this .name = name; this .age = age; } }
简化日志开发
1 2 3 4 5 6 7 8 9 @Slf4j @RestController public class HelloController { @RequestMapping("/hello") public String handle01 (@RequestParam("name") String name) { log.info("请求进来了...." ); return "Hello, Spring Boot 2!" +"你好:" +name; } }
Spring Boot includes an additional set of tools that can make the application development experience a little more pleasant. The spring-boot-devtools module can be included in any project to provide additional development-time features.——link
Applications that use spring-boot-devtools automatically restart whenever files on the classpath change. This can be a useful feature when working in an IDE, as it gives a very fast feedback loop for code changes. By default, any entry on the classpath that points to a directory is monitored for changes. Note that certain resources, such as static assets and view templates, do not need to restart the application .——link
Triggering a restart
As DevTools monitors classpath resources, the only way to trigger a restart is to update the classpath. The way in which you cause the classpath to be updated depends on the IDE that you are using:
In Eclipse, saving a modified file causes the classpath to be updated and triggers a restart.
In IntelliJ IDEA, building the project (Build -> Build Project)(shortcut: Ctrl+F9) has the same effect.
添加依赖:
1 2 3 4 5 6 7 <dependencies > <dependency > <groupId > org.springframework.boot</groupId > <artifactId > spring-boot-devtools</artifactId > <optional > true</optional > </dependency > </dependencies >
在IDEA中,项目或者页面修改以后:Ctrl+F9。
19、最佳实践-Spring Initailizr Spring Initailizr 是创建Spring Boot工程向导。
在IDEA中,菜单栏New -> Project -> Spring Initailizr。
20、配置文件-yaml的用法 同以前的properties用法
YAML 是 “YAML Ain’t Markup Language”(YAML 不是一种标记语言)的递归缩写。在开发的这种语言时,YAML 的意思其实是:”Yet Another Markup Language”(仍是一种标记语言)。
非常适合用来做以数据为中心的配置文件 。
基本语法
key: value;kv之间有空格
大小写敏感
使用缩进表示层级关系
缩进不允许使用tab,只允许空格
缩进的空格数不重要,只要相同层级的元素左对齐即可
‘#’表示注释
字符串无需加引号,如果要加,单引号’’、双引号””表示字符串内容会被 转义、不转义
数据类型
字面量:单个的、不可再分的值。date、boolean、string、number、null
对象:键值对的集合。map、hash、set、object
1 2 3 4 5 6 7 8 9 10 k: {k1:v1 ,k2:v2 ,k3:v3 }k: k1: v1 k2: v2 k3: v3
数组:一组按次序排列的值。array、list、queue
1 2 3 4 5 6 7 8 9 10 k: [v1 ,v2 ,v3 ]k: - v1 - v2 - v3
实例 1 2 3 4 5 6 7 8 9 10 11 12 13 14 15 16 17 18 19 @Data public class Person { private String userName; private Boolean boss; private Date birth; private Integer age; private Pet pet; private String[] interests; private List<String> animal; private Map<String, Object> score; private Set<Double> salarys; private Map<String, List<Pet>> allPets; } @Data public class Pet { private String name; private Double weight; }
用yaml表示以上对象
1 2 3 4 5 6 7 8 9 10 11 12 13 14 15 16 17 18 19 20 21 22 23 24 25 person: userName: zhangsan boss: false birth: 2019 /12/12 20 :12:33 age: 18 pet: name: tomcat weight: 23.4 interests: [篮球 ,游泳 ] animal: - jerry - mario score: english: first: 30 second: 40 third: 50 math: [131 ,140 ,148 ] chinese: {first: 128 ,second: 136 } salarys: [3999 ,4999.98 ,5999.99 ] allPets: sick: - {name: tom } - {name: jerry ,weight: 47 } health: [{name: mario ,weight: 47 }]
21、配置文件-自定义类绑定的配置提示
You can easily generate your own configuration metadata file from items annotated with @ConfigurationProperties by using the spring-boot-configuration-processor jar. The jar includes a Java annotation processor which is invoked as your project is compiled.——link
自定义的类和配置文件绑定一般没有提示。若要提示,添加如下依赖:
1 2 3 4 5 6 7 8 9 10 11 12 13 14 15 16 17 18 19 20 21 22 23 <dependency > <groupId > org.springframework.boot</groupId > <artifactId > spring-boot-configuration-processor</artifactId > <optional > true</optional > </dependency > <build > <plugins > <plugin > <groupId > org.springframework.boot</groupId > <artifactId > spring-boot-maven-plugin</artifactId > <configuration > <excludes > <exclude > <groupId > org.springframework.boot</groupId > <artifactId > spring-boot-configuration-processor</artifactId > </exclude > </excludes > </configuration > </plugin > </plugins > </build >
22、web场景-web开发简介 Spring Boot provides auto-configuration for Spring MVC that works well with most applications.(大多场景我们都无需自定义配置)
The auto-configuration adds the following features on top of Spring’s defaults:
Inclusion of ContentNegotiatingViewResolver and BeanNameViewResolver beans.
Support for serving static resources, including support for WebJars (covered later in this document )).
Automatic registration of Converter, GenericConverter, and Formatter beans.
自动注册 Converter,GenericConverter,Formatter
Support for HttpMessageConverters (covered later in this document ).
支持 HttpMessageConverters (后来我们配合内容协商理解原理)
Automatic registration of MessageCodesResolver (covered later in this document ).
自动注册 MessageCodesResolver (国际化用)
Static index.html support.
Custom Favicon support (covered later in this document ).
Automatic use of a ConfigurableWebBindingInitializer bean (covered later in this document ).
自动使用 ConfigurableWebBindingInitializer ,(DataBinder负责将请求数据绑定到JavaBean上)
If you want to keep those Spring Boot MVC customizations and make more MVC customizations (interceptors, formatters, view controllers, and other features), you can add your own @Configuration class of type WebMvcConfigurer but without @EnableWebMvc.
不用@EnableWebMvc注解。使用 @Configuration+ WebMvcConfigurer自定义规则
If you want to provide custom instances of RequestMappingHandlerMapping, RequestMappingHandlerAdapter, or ExceptionHandlerExceptionResolver, and still keep the Spring Boot MVC customizations, you can declare a bean of type WebMvcRegistrations and use it to provide custom instances of those components.
声明 WebMvcRegistrations改变默认底层组件
If you want to take complete control of Spring MVC, you can add your own @Configuration annotated with @EnableWebMvc, or alternatively add your own @Configuration-annotated DelegatingWebMvcConfiguration as described in the Javadoc of @EnableWebMvc.
使用 @EnableWebMvc+@Configuration+DelegatingWebMvcConfiguration 全面接管SpringMVC
23、web场景-静态资源规则与定制化 静态资源目录 只要静态资源放在类路径下: called /static (or /public or /resources or /META-INF/resources
访问 : 当前项目根路径/ + 静态资源名
原理: 静态映射/**。
请求进来,先去找Controller看能不能处理。不能处理的所有请求又都交给静态资源处理器。静态资源也找不到则响应404页面。
也可以改变默认的静态资源路径,/static,/public,/resources, /META-INF/resources失效
1 2 resources: static-locations: [classpath:/haha/ ]
静态资源访问前缀 1 2 3 spring: mvc: static-path-pattern: /res/**
当前项目 + static-path-pattern + 静态资源名 = 静态资源文件夹下找
webjar 可用jar方式添加css,js等资源文件,
https://www.webjars.org/
例如,添加jquery
1 2 3 4 5 <dependency > <groupId > org.webjars</groupId > <artifactId > jquery</artifactId > <version > 3.5.1</version > </dependency >
访问地址:http://localhost:8080/webjars/jquery/3.5.1/jquery.js 后面地址要按照依赖里面的包路径。
24、web场景-welcome与favicon功能 官方文档
欢迎页支持
静态资源路径下 index.html。
可以配置静态资源路径
但是不可以配置静态资源的访问前缀。否则导致 index.html不能被默认访问
1 2 3 4 5 spring: resources: static-locations: [classpath:/haha/ ]
自定义Favicon 指网页标签上的小图标。
favicon.ico 放在静态资源目录下即可。
25、web场景-【源码分析】-静态资源原理
SpringBoot启动默认加载 xxxAutoConfiguration 类(自动配置类)
SpringMVC功能的自动配置类WebMvcAutoConfiguration,生效
1 2 3 4 5 6 7 8 9 10 @Configuration(proxyBeanMethods = false) @ConditionalOnWebApplication(type = Type.SERVLET) @ConditionalOnClass({ Servlet.class, DispatcherServlet.class, WebMvcConfigurer.class }) @ConditionalOnMissingBean(WebMvcConfigurationSupport.class) @AutoConfigureOrder(Ordered.HIGHEST_PRECEDENCE + 10) @AutoConfigureAfter({ DispatcherServletAutoConfiguration.class, TaskExecutionAutoConfiguration.class, ValidationAutoConfiguration.class }) public class WebMvcAutoConfiguration { ... }
给容器中配置的内容:
通过WebMvcAutoConfiguration类中的 WebMvcAutoConfigurationAdapter方法进行配置绑定
配置文件的相关属性的绑定:WebMvcProperties == spring.mvc 、ResourceProperties == spring.resources
1 2 3 4 5 6 7 @Configuration(proxyBeanMethods = false) @Import(EnableWebMvcConfiguration.class) @EnableConfigurationProperties({ WebMvcProperties.class, ResourceProperties.class }) @Order(0) public static class WebMvcAutoConfigurationAdapter implements WebMvcConfigurer { ... }
配置类只有一个有参构造器 1 2 3 4 5 6 7 8 9 10 11 12 13 14 15 16 17 18 19 ... public class WebMvcAutoConfiguration { ... public WebMvcAutoConfigurationAdapter (WebProperties webProperties, WebMvcProperties mvcProperties, ListableBeanFactory beanFactory, ObjectProvider<HttpMessageConverters> messageConvertersProvider, ObjectProvider<ResourceHandlerRegistrationCustomizer> resourceHandlerRegistrationCustomizerProvider, ObjectProvider<DispatcherServletPath> dispatcherServletPath, ObjectProvider<ServletRegistrationBean<?>> servletRegistrations) { this .mvcProperties = mvcProperties; this .beanFactory = beanFactory; this .messageConvertersProvider = messageConvertersProvider; this .resourceHandlerRegistrationCustomizer = resourceHandlerRegistrationCustomizerProvider.getIfAvailable(); this .dispatcherServletPath = dispatcherServletPath; this .servletRegistrations = servletRegistrations; this .mvcProperties.checkConfiguration(); } ... }
ResourceProperties resourceProperties;获取和spring.resources绑定的所有的值的对象
WebMvcProperties mvcProperties 获取和spring.mvc绑定的所有的值的对象
ListableBeanFactory beanFactory Spring的beanFactory
HttpMessageConverters 找到所有的HttpMessageConverters
ResourceHandlerRegistrationCustomizer 找到 资源处理器的自定义器。
DispatcherServletPath
ServletRegistrationBean 给应用注册Servlet、Filter….
资源处理的默认规则(EnableWebMvcConfiguration方法) 1 2 3 4 5 6 7 8 9 10 11 12 13 14 15 16 17 18 19 20 21 22 23 24 25 26 27 ... public class WebMvcAutoConfiguration { ... public static class EnableWebMvcConfiguration extends DelegatingWebMvcConfiguration implements ResourceLoaderAware { ... @Override protected void addResourceHandlers (ResourceHandlerRegistry registry) { super .addResourceHandlers(registry); if (!this .resourceProperties.isAddMappings()) { logger.debug("Default resource handling disabled" ); return ; } ServletContext servletContext = getServletContext(); addResourceHandler(registry, "/webjars/**" , "classpath:/META-INF/resources/webjars/" ); addResourceHandler(registry, this .mvcProperties.getStaticPathPattern(), (registration) -> { registration.addResourceLocations(this .resourceProperties.getStaticLocations()); if (servletContext != null ) { registration.addResourceLocations(new ServletContextResource (servletContext, SERVLET_LOCATION)); } }); } ... } ... }
根据上述代码,我们可以同过配置禁止所有静态资源规则。
1 2 3 spring: resources: add-mappings: false
静态资源规则:
``addResourceHandler(registry, this.mvcProperties.getStaticPathPattern(), (registration) -> {registration.addResourceLocations(this.resourceProperties.getStaticLocations());
1 2 3 4 5 6 7 8 9 10 11 12 13 14 @ConfigurationProperties(prefix = "spring.resources", ignoreUnknownFields = false) public class ResourceProperties { private static final String[] CLASSPATH_RESOURCE_LOCATIONS = { "classpath:/META-INF/resources/" , "classpath:/resources/" , "classpath:/static/" , "classpath:/public/" }; private String[] staticLocations = CLASSPATH_RESOURCE_LOCATIONS; ... }
欢迎页的处理规则(WelcomePageHandlerMapping()方法) 1 2 3 4 5 6 7 8 9 10 11 12 13 14 15 16 17 ... public class WebMvcAutoConfiguration { ... public static class EnableWebMvcConfiguration extends DelegatingWebMvcConfiguration implements ResourceLoaderAware { ... @Bean public WelcomePageHandlerMapping welcomePageHandlerMapping (ApplicationContext applicationContext, FormattingConversionService mvcConversionService, ResourceUrlProvider mvcResourceUrlProvider) { WelcomePageHandlerMapping welcomePageHandlerMapping = new WelcomePageHandlerMapping ( new TemplateAvailabilityProviders (applicationContext), applicationContext, getWelcomePage(), this .mvcProperties.getStaticPathPattern()); welcomePageHandlerMapping.setInterceptors(getInterceptors(mvcConversionService, mvcResourceUrlProvider)); welcomePageHandlerMapping.setCorsConfigurations(getCorsConfigurations()); return welcomePageHandlerMapping; } } }
WelcomePageHandlerMapping的构造方法如下:
1 2 3 4 5 6 7 8 9 10 11 12 13 WelcomePageHandlerMapping(TemplateAvailabilityProviders templateAvailabilityProviders, ApplicationContext applicationContext, Resource welcomePage, String staticPathPattern) { if (welcomePage != null && "/**" .equals(staticPathPattern)) { logger.info("Adding welcome page: " + welcomePage); setRootViewName("forward:index.html" ); } else if (welcomeTemplateExists(templateAvailabilityProviders, applicationContext)) { logger.info("Adding welcome page template: index" ); setRootViewName("index" ); } }
这构造方法内的代码也解释了web场景-welcome与favicon功能 中配置static-path-pattern了,welcome页面和小图标失效的问题。
26、请求处理-【源码分析】-Rest映射及源码解析 请求映射
1 2 3 4 5 spring: mvc: hiddenmethod: filter: enabled: true
1 2 3 4 5 6 7 8 9 10 11 12 13 14 15 16 17 <form action ="/user" method ="get" > <input value ="REST-GET提交" type ="submit" /> </form > <form action ="/user" method ="post" > <input value ="REST-POST提交" type ="submit" /> </form > <form action ="/user" method ="post" > <input name ="_method" type ="hidden" value ="DELETE" /> <input value ="REST-DELETE 提交" type ="submit" /> </form > <form action ="/user" method ="post" > <input name ="_method" type ="hidden" value ="PUT" /> <input value ="REST-PUT提交" type ="submit" /> <form >
1 2 3 4 5 6 7 8 9 10 11 12 13 14 15 16 17 18 19 20 21 22 23 @GetMapping("/user") public String getUser () { return "GET-张三" ; } @PostMapping("/user") public String saveUser () { return "POST-张三" ; } @PutMapping("/user") public String putUser () { return "PUT-张三" ; } @DeleteMapping("/user") public String deleteUser () { return "DELETE-张三" ; }
Rest原理(表单提交要使用REST的时候)
表单提交会带上\_method=PUT
请求过来被 HiddenHttpMethodFilter拦截
请求是否正常,并且是POST
获取到\_method的值。
兼容以下请求;PUT .DELETE .PATCH
原生request(post),包装模式requesWrapper重写了getMethod方法,返回的是传入的值。 过滤器链放行的时候用wrapper。以后的方法调用getMethod是调用requesWrapper的。
1 2 3 4 5 6 7 8 9 10 11 12 13 14 15 16 17 18 19 20 21 22 23 24 25 26 27 28 29 30 31 32 33 34 35 36 37 38 39 40 41 42 43 44 45 46 47 48 49 50 51 52 53 54 55 56 57 58 59 60 61 62 63 64 65 66 67 public class HiddenHttpMethodFilter extends OncePerRequestFilter { private static final List<String> ALLOWED_METHODS = Collections.unmodifiableList(Arrays.asList(HttpMethod.PUT.name(), HttpMethod.DELETE.name(), HttpMethod.PATCH.name())); public static final String DEFAULT_METHOD_PARAM = "_method" ; private String methodParam = DEFAULT_METHOD_PARAM; public void setMethodParam (String methodParam) { Assert.hasText(methodParam, "'methodParam' must not be empty" ); this .methodParam = methodParam; } @Override protected void doFilterInternal (HttpServletRequest request, HttpServletResponse response, FilterChain filterChain) throws ServletException, IOException { HttpServletRequest requestToUse = request; if ("POST" .equals(request.getMethod()) && request.getAttribute(WebUtils.ERROR_EXCEPTION_ATTRIBUTE) == null ) { String paramValue = request.getParameter(this .methodParam); if (StringUtils.hasLength(paramValue)) { String method = paramValue.toUpperCase(Locale.ENGLISH); if (ALLOWED_METHODS.contains(method)) { requestToUse = new HttpMethodRequestWrapper (request, method); } } } filterChain.doFilter(requestToUse, response); } private static class HttpMethodRequestWrapper extends HttpServletRequestWrapper { private final String method; public HttpMethodRequestWrapper (HttpServletRequest request, String method) { super (request); this .method = method; } @Override public String getMethod () { return this .method; } } }
Rest使用客户端工具。
如PostMan可直接发送put、delete等方式请求。
27、请求处理-【源码分析】-怎么改变默认的_method 1 2 3 4 5 6 7 8 9 10 11 12 13 14 15 16 17 18 19 20 21 @Configuration(proxyBeanMethods = false) @ConditionalOnWebApplication(type = Type.SERVLET) @ConditionalOnClass({ Servlet.class, DispatcherServlet.class, WebMvcConfigurer.class }) @ConditionalOnMissingBean(WebMvcConfigurationSupport.class) @AutoConfigureOrder(Ordered.HIGHEST_PRECEDENCE + 10) @AutoConfigureAfter({ DispatcherServletAutoConfiguration.class, TaskExecutionAutoConfiguration.class, ValidationAutoConfiguration.class }) public class WebMvcAutoConfiguration { ... @Bean @ConditionalOnMissingBean(HiddenHttpMethodFilter.class) @ConditionalOnProperty(prefix = "spring.mvc.hiddenmethod.filter", name = "enabled", matchIfMissing = false) public OrderedHiddenHttpMethodFilter hiddenHttpMethodFilter () { return new OrderedHiddenHttpMethodFilter (); } ... }
@ConditionalOnMissingBean(HiddenHttpMethodFilter.class)意味着在没有HiddenHttpMethodFilter时,才执行hiddenHttpMethodFilter()。(如果你没配置HiddenHttpMethodFilter,springboot就会帮你配置默认的)。因此,为了不使用默认的_method,我们可以自定义filter,改变默认的_method的值。例如:
1 2 3 4 5 6 7 8 9 10 11 @Configuration(proxyBeanMethods = false) public class WebConfig { @Bean public HiddenHttpMethodFilter hiddenHttpMethodFilter () { HiddenHttpMethodFilter methodFilter = new HiddenHttpMethodFilter (); methodFilter.setMethodParam("_m" ); return methodFilter; } }
将_method改成_m。
1 2 3 4 <form action ="/user" method ="post" > <input name ="_m" type ="hidden" value ="DELETE" /> <input value ="REST-DELETE 提交" type ="submit" /> </form >
28、请求处理-【源码分析】-请求映射原理 org.springframework.web.servlet.DispatcherServlet -> doDispatch()
1 2 3 4 5 6 7 8 9 10 11 12 13 14 15 16 17 18 19 20 21 22 23 24 25 26 27 28 protected void doDispatch (HttpServletRequest request, HttpServletResponse response) throws Exception { HttpServletRequest processedRequest = request; HandlerExecutionChain mappedHandler = null ; boolean multipartRequestParsed = false ; WebAsyncManager asyncManager = WebAsyncUtils.getAsyncManager(request); try { ModelAndView mv = null ; Exception dispatchException = null ; try { processedRequest = checkMultipart(request); multipartRequestParsed = (processedRequest != request); mappedHandler = getHandler(processedRequest); ... }
mappedHandler=getHandleer(processedRequest)找到能处理当前请求的处理器getHandler()方法如下:
1 2 3 4 5 6 7 8 9 10 11 12 13 @Nullable protected HandlerExecutionChain getHandler (HttpServletRequest request) throws Exception { if (this .handlerMappings != null ) { for (HandlerMapping mapping : this .handlerMappings) { HandlerExecutionChain handler = mapping.getHandler(request); if (handler != null ) { return handler; } } } return null ; }
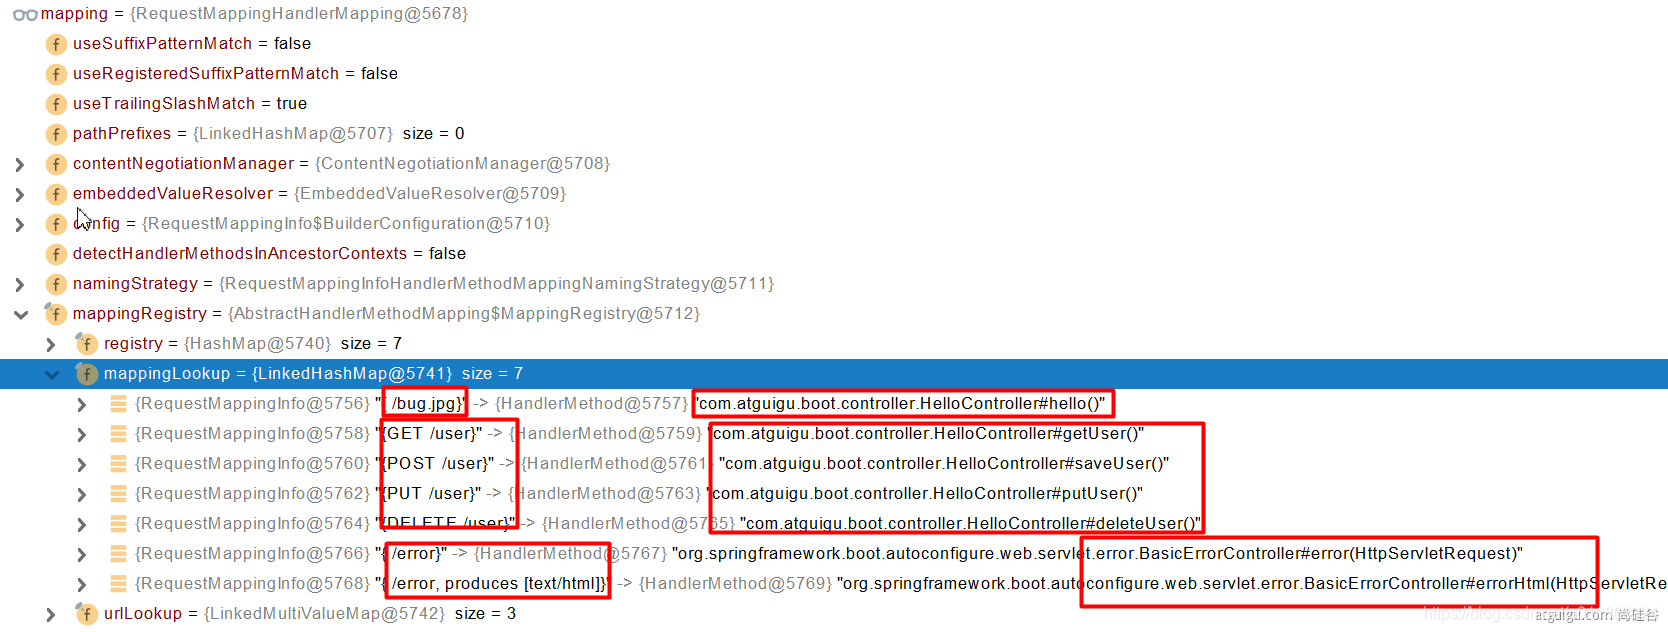
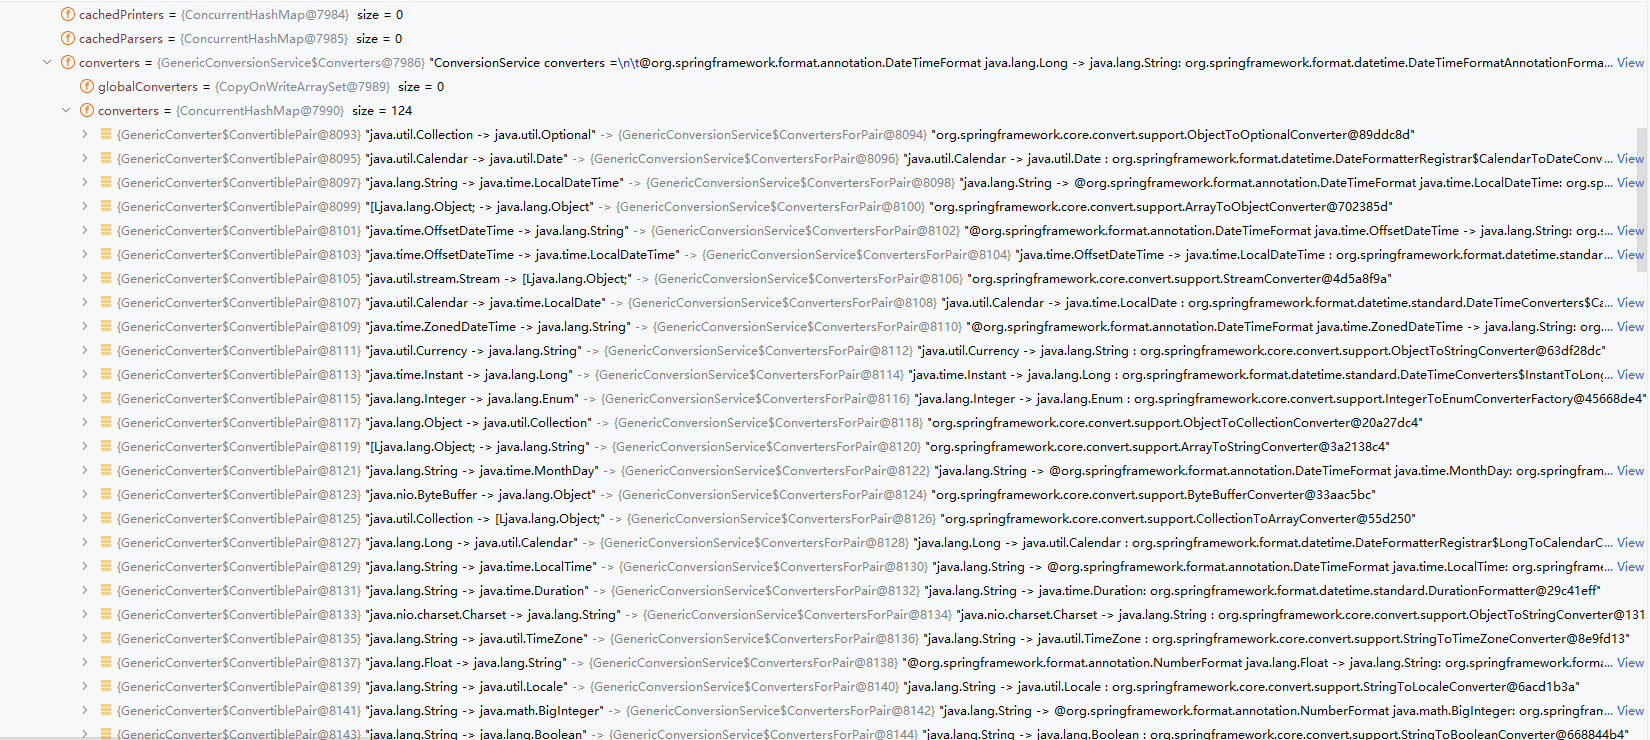
总结就是使用增强for循环在所有handlerMappings中找到能处理当前请求的handlerMappingthis.handlerMappings在Debug模式下展现的内容:
其中,保存了所有@RequestMapping 和handler的映射规则。
所有的请求映射都在HandlerMapping中:
SpringBoot自动配置欢迎页的 WelcomePageHandlerMapping 。访问 /能访问到index.html;
SpringBoot自动配置了默认 的 RequestMappingHandlerMapping
请求进来,挨个尝试所有的HandlerMapping看是否有请求信息。
如果有就找到这个请求对应的handler
如果没有就是下一个 HandlerMapping
我们需要一些自定义的映射处理,我们也可以自己给容器中放HandlerMapping 。自定义 HandlerMapping
上述获取handler补充:
1 2 3 4 5 6 7 8 9 10 11 12 13 14 @Nullable protected HandlerExecutionChain getHandler (HttpServletRequest request) throws Exception { if (this .handlerMappings != null ) { for (HandlerMapping mapping : this .handlerMappings) { HandlerExecutionChain handler = mapping.getHandler(request); if (handler != null ) { return handler; } } } return null ; }
1 2 3 4 5 6 7 8 9 10 11 12 13 14 15 16 17 18 19 20 21 22 23 24 25 26 27 28 29 30 31 32 33 34 35 36 37 38 39 40 41 42 43 44 @Nullable public final HandlerExecutionChain getHandler (HttpServletRequest request) throws Exception { Object handler = this .getHandlerInternal(request); if (handler == null ) { handler = this .getDefaultHandler(); } if (handler == null ) { return null ; } else { if (handler instanceof String) { String handlerName = (String)handler; handler = this .obtainApplicationContext().getBean(handlerName); } if (!ServletRequestPathUtils.hasCachedPath(request)) { this .initLookupPath(request); } HandlerExecutionChain executionChain = this .getHandlerExecutionChain(handler, request); if (this .logger.isTraceEnabled()) { this .logger.trace("Mapped to " + handler); } else if (this .logger.isDebugEnabled() && !DispatcherType.ASYNC.equals(request.getDispatcherType())) { this .logger.debug("Mapped to " + executionChain.getHandler()); } if (this .hasCorsConfigurationSource(handler) || CorsUtils.isPreFlightRequest(request)) { CorsConfiguration config = this .getCorsConfiguration(handler, request); if (this .getCorsConfigurationSource() != null ) { CorsConfiguration globalConfig = this .getCorsConfigurationSource().getCorsConfiguration(request); config = globalConfig != null ? globalConfig.combine(config) : config; } if (config != null ) { config.validateAllowCredentials(); } executionChain = this .getCorsHandlerExecutionChain(request, executionChain, config); } return executionChain; } }
1 2 3 4 5 6 7 8 9 10 11 12 13 @Nullable protected HandlerMethod getHandlerInternal (HttpServletRequest request) throws Exception { request.removeAttribute(PRODUCIBLE_MEDIA_TYPES_ATTRIBUTE); HandlerMethod var2; try { var2 = super .getHandlerInternal(request); } finally { ProducesRequestCondition.clearMediaTypesAttribute(request); } return var2; }
1 2 3 4 5 6 7 8 9 10 11 12 13 14 15 @Nullable protected HandlerMethod getHandlerInternal (HttpServletRequest request) throws Exception { String lookupPath = this .initLookupPath(request); this .mappingRegistry.acquireReadLock(); HandlerMethod var4; try { HandlerMethod handlerMethod = this .lookupHandlerMethod(lookupPath, request); var4 = handlerMethod != null ? handlerMethod.createWithResolvedBean() : null ; } finally { this .mappingRegistry.releaseReadLock(); } return var4; }
1 2 3 4 5 6 7 8 9 10 11 12 13 14 15 16 17 18 19 20 21 22 23 24 25 26 27 28 29 30 31 32 33 34 35 36 37 38 39 40 41 42 43 44 45 46 47 48 49 50 51 52 53 54 protected HandlerMethod lookupHandlerMethod (String lookupPath, HttpServletRequest request) throws Exception { List<AbstractHandlerMethodMapping<T>.Match> matches = new ArrayList (); List<T> directPathMatches = this .mappingRegistry.getMappingsByDirectPath(lookupPath); if (directPathMatches != null ) { this .addMatchingMappings(directPathMatches, matches, request); } if (matches.isEmpty()) { this .addMatchingMappings(this .mappingRegistry.getRegistrations().keySet(), matches, request); } if (matches.isEmpty()) { return this .handleNoMatch(this .mappingRegistry.getRegistrations().keySet(), lookupPath, request); } else { AbstractHandlerMethodMapping<T>.Match bestMatch = (Match)matches.get(0 ); if (matches.size() > 1 ) { Comparator<AbstractHandlerMethodMapping<T>.Match> comparator = new MatchComparator (this .getMappingComparator(request)); matches.sort(comparator); bestMatch = (Match)matches.get(0 ); if (this .logger.isTraceEnabled()) { Log var10000 = this .logger; int var10001 = matches.size(); var10000.trace("" + var10001 + " matching mappings: " + matches); } if (CorsUtils.isPreFlightRequest(request)) { Iterator var7 = matches.iterator(); while (var7.hasNext()) { AbstractHandlerMethodMapping<T>.Match match = (Match)var7.next(); if (match.hasCorsConfig()) { return PREFLIGHT_AMBIGUOUS_MATCH; } } } else { AbstractHandlerMethodMapping<T>.Match secondBestMatch = (Match)matches.get(1 ); if (comparator.compare(bestMatch, secondBestMatch) == 0 ) { Method m1 = bestMatch.getHandlerMethod().getMethod(); Method m2 = secondBestMatch.getHandlerMethod().getMethod(); String uri = request.getRequestURI(); throw new IllegalStateException ("Ambiguous handler methods mapped for '" + uri + "': {" + m1 + ", " + m2 + "}" ); } } } request.setAttribute(BEST_MATCHING_HANDLER_ATTRIBUTE, bestMatch.getHandlerMethod()); this .handleMatch(bestMatch.mapping, lookupPath, request); return bestMatch.getHandlerMethod(); } }
IDEA快捷键:
Ctrl + Alt + U : 以UML的类图展现类有哪些继承类,派生类以及实现哪些接口。
Crtl + Alt + Shift + U : 同上,区别在于上条快捷键结果在新页展现,而本条快捷键结果在弹窗展现。
Ctrl + H : 以树形方式展现类层次结构图。
29、请求处理-常用参数注解使用 注解:
@PathVariable 路径变量@RequestHeader 获取请求头@RequestParam 获取请求参数(指问号后的参数,url?a=1&b=2)@CookieValue 获取Cookie值@RequestAttribute 获取request域属性@RequestBody 获取请求体[POST]@MatrixVariable 矩阵变量@ModelAttribute
使用用例:
1 2 3 4 5 6 7 8 9 10 11 12 13 14 15 16 17 18 19 20 21 22 23 24 25 26 27 28 29 30 31 32 33 34 35 36 37 38 39 40 @RestController public class ParameterTestController { @GetMapping("/car/{id}/owner/{username}") public Map<String,Object> getCar (@PathVariable("id") Integer id, @PathVariable("username") String name, @PathVariable Map<String,String> pv, @RequestHeader("User-Agent") String userAgent, @RequestHeader Map<String,String> header, @RequestParam("age") Integer age, @RequestParam("inters") List<String> inters, @RequestParam Map<String,String> params, @CookieValue("_ga") String _ga, @CookieValue("_ga") Cookie cookie) { Map<String,Object> map = new HashMap <>(); map.put("age" ,age); map.put("inters" ,inters); map.put("params" ,params); map.put("_ga" ,_ga); System.out.println(cookie.getName()+"===>" +cookie.getValue()); return map; } @PostMapping("/save") public Map postMethod (@RequestBody String content) { Map<String,Object> map = new HashMap <>(); map.put("content" ,content); return map; } }
30、请求处理-@RequestAttribute 用例:
1 2 3 4 5 6 7 8 9 10 11 12 13 14 15 16 17 18 19 20 21 22 23 24 25 26 27 28 29 30 31 32 33 34 35 36 37 38 39 40 41 42 43 44 45 46 47 @Controller public class RequestController { @GetMapping("/goto") public String goToPage (HttpServletRequest request) { request.setAttribute("msg" ,"成功了..." ); request.setAttribute("code" ,200 ); return "forward:/success" ; } @GetMapping("/params") public String testParam (Map<String,Object> map, Model model, HttpServletRequest request, HttpServletResponse response) { map.put("hello" ,"world666" ); model.addAttribute("world" ,"hello666" ); request.setAttribute("message" ,"HelloWorld" ); Cookie cookie = new Cookie ("c1" ,"v1" ); response.addCookie(cookie); return "forward:/success" ; } @ResponseBody @GetMapping("/success") public Map success (@RequestAttribute(value = "msg",required = false) String msg, @RequestAttribute(value = "code",required = false) Integer code, HttpServletRequest request) { Object msg1 = request.getAttribute("msg" ); Map<String,Object> map = new HashMap <>(); Object hello = request.getAttribute("hello" ); Object world = request.getAttribute("world" ); Object message = request.getAttribute("message" ); map.put("reqMethod_msg" ,msg1); map.put("annotation_msg" ,msg); map.put("hello" ,hello); map.put("world" ,world); map.put("message" ,message); return map; } }
31、请求处理-@MatrixVariable与UrlPathHelper
语法: 请求路径:/cars/sell;low=34;brand=byd,audi,yd
SpringBoot默认是禁用了矩阵变量的功能
手动开启:原理。对于路径的处理。UrlPathHelper的removeSemicolonContent设置为false,让其支持矩阵变量的。
矩阵变量必须 有url路径变量才能被解析
手动开启矩阵变量 :
1 2 3 4 5 6 7 8 9 10 11 @Configuration(proxyBeanMethods = false) public class WebConfig implements WebMvcConfigurer { @Override public void configurePathMatch (PathMatchConfigurer configurer) { UrlPathHelper urlPathHelper = new UrlPathHelper (); urlPathHelper.setRemoveSemicolonContent(false ); configurer.setUrlPathHelper(urlPathHelper); } }
创建返回WebMvcConfigurerBean:
1 2 3 4 5 6 7 8 9 10 11 12 13 14 15 @Configuration(proxyBeanMethods = false) public class WebConfig { @Bean public WebMvcConfigurer webMvcConfigurer () { return new WebMvcConfigurer () { @Override public void configurePathMatch (PathMatchConfigurer configurer) { UrlPathHelper urlPathHelper = new UrlPathHelper (); urlPathHelper.setRemoveSemicolonContent(false ); configurer.setUrlPathHelper(urlPathHelper); } } } }
@MatrixVariable的用例
1 2 3 4 5 6 7 8 9 10 11 12 13 14 15 16 17 18 19 20 21 22 23 24 25 26 27 28 29 30 @RestController public class ParameterTestController { @GetMapping("/cars/{path}") public Map carsSell (@MatrixVariable("low") Integer low, @MatrixVariable("brand") List<String> brand, @PathVariable("path") String path) { Map<String,Object> map = new HashMap <>(); map.put("low" ,low); map.put("brand" ,brand); map.put("path" ,path); return map; } @GetMapping("/boss/{bossId}/{empId}") public Map boss (@MatrixVariable(value = "age",pathVar = "bossId") Integer bossAge, @MatrixVariable(value = "age",pathVar = "empId") Integer empAge) { Map<String,Object> map = new HashMap <>(); map.put("bossAge" ,bossAge); map.put("empAge" ,empAge); return map; } }
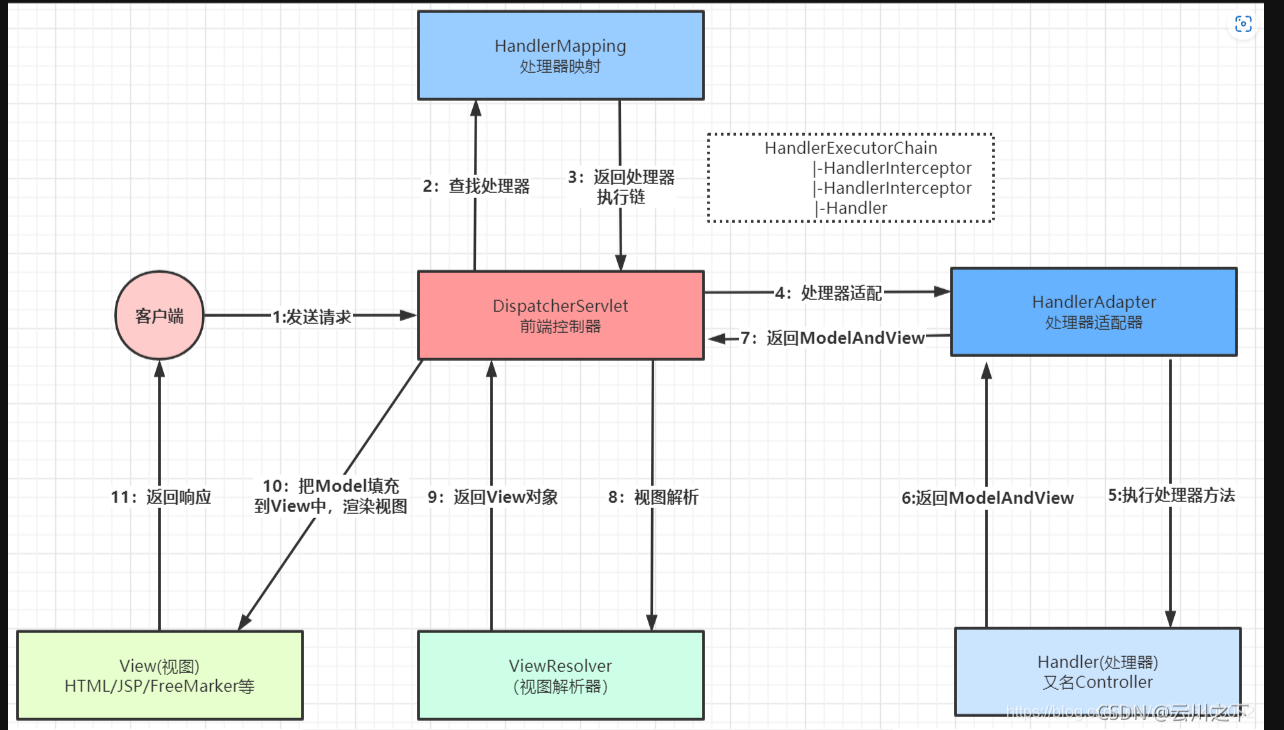
一个完整的前端控制器DispatcherServlet处理客户端请求的完整过程
32、请求处理-【源码分析】-各种类型参数解析原理 这要从DispatcherServlet开始说起:
1 2 3 4 5 6 7 8 9 10 11 12 13 14 15 16 17 18 19 20 21 22 23 24 25 26 27 28 public class DispatcherServlet extends FrameworkServlet { protected void doDispatch (HttpServletRequest request, HttpServletResponse response) throws Exception { HttpServletRequest processedRequest = request; HandlerExecutionChain mappedHandler = null ; boolean multipartRequestParsed = false ; WebAsyncManager asyncManager = WebAsyncUtils.getAsyncManager(request); try { ModelAndView mv = null ; Exception dispatchException = null ; try { processedRequest = checkMultipart(request); multipartRequestParsed = (processedRequest != request); mappedHandler = getHandler(processedRequest); if (mappedHandler == null ) { noHandlerFound(processedRequest, response); return ; } HandlerAdapter ha = getHandlerAdapter(mappedHandler.getHandler()); ...
1 2 3 4 5 6 7 8 9 10 11 12 13 14 15 16 17 18 protected HandlerAdapter getHandlerAdapter (Object handler) throws ServletException { if (this .handlerAdapters != null ) { Iterator var2 = this .handlerAdapters.iterator(); while (var2.hasNext()) { HandlerAdapter adapter = (HandlerAdapter)var2.next(); if (adapter.supports(handler)) { return adapter; } } } throw new ServletException ("No adapter for handler [" + handler + "]: The DispatcherServlet configuration needs to include a HandlerAdapter that supports this handler" ); }
HandlerMapping中找到能处理请求的Handler(Controller.method())。为当前Handler 找一个适配器 HandlerAdapter(通过反射来获取请求参数和调用方法),用的最多的是RequestMappingHandlerAdapter 。底层也是基于反射确定请求方法的参数值并调用方法。
适配器执行目标方法并确定方法参数的每一个值。
HandlerAdapter 默认会加载所有HandlerAdapter
1 2 3 4 5 6 7 8 9 10 11 12 13 14 15 16 17 18 19 20 21 public class DispatcherServlet extends FrameworkServlet { private boolean detectAllHandlerAdapters = true ; ... private void initHandlerAdapters (ApplicationContext context) { this .handlerAdapters = null ; if (this .detectAllHandlerAdapters) { Map<String, HandlerAdapter> matchingBeans = BeanFactoryUtils.beansOfTypeIncludingAncestors(context, HandlerAdapter.class, true , false ); if (!matchingBeans.isEmpty()) { this .handlerAdapters = new ArrayList <>(matchingBeans.values()); AnnotationAwareOrderComparator.sort(this .handlerAdapters); } } ...
有这些HandlerAdapter:
支持方法上标注@RequestMapping
支持函数式编程的
…
…
执行目标方法 1 2 3 4 5 6 7 8 9 10 11 12 13 14 15 16 17 18 19 20 21 public class DispatcherServlet extends FrameworkServlet { protected void doDispatch (HttpServletRequest request, HttpServletResponse response) throws Exception { ModelAndView mv = null ; ... mappedHandler = getHandler(processedRequest); if (mappedHandler == null ) { noHandlerFound(processedRequest, response); return ; } HandlerAdapter ha = getHandlerAdapter(mappedHandler.getHandler()); ... mv = ha.handle(processedRequest, response, mappedHandler.getHandler());
HandlerAdapter接口实现类RequestMappingHandlerAdapter(主要用来处理@RequestMapping)
1 2 3 4 5 6 7 8 9 10 11 12 13 14 15 16 17 18 19 20 21 22 23 public class RequestMappingHandlerAdapter extends AbstractHandlerMethodAdapter implements BeanFactoryAware , InitializingBean { ... public final ModelAndView handle (HttpServletRequest request, HttpServletResponse response, Object handler) throws Exception { return handleInternal(request, response, (HandlerMethod) handler); } @Override protected ModelAndView handleInternal (HttpServletRequest request, HttpServletResponse response, HandlerMethod handlerMethod) throws Exception { ModelAndView mav; mav = invokeHandlerMethod(request, response, handlerMethod); return mav; } }
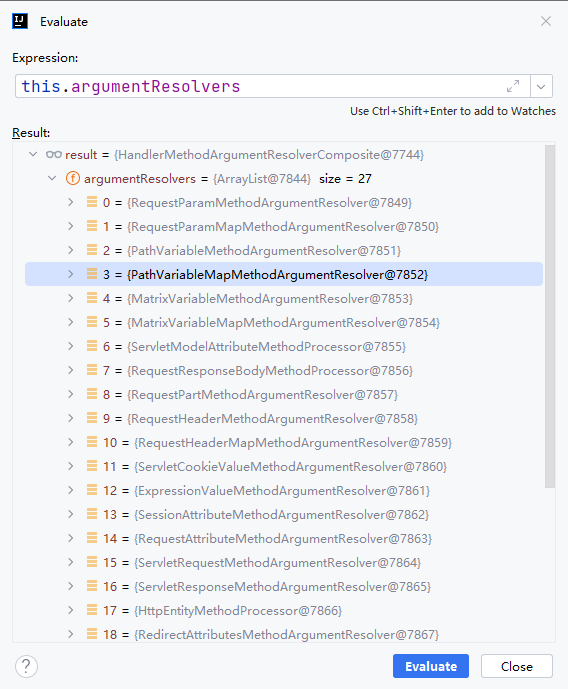
参数解析器 确定将要执行的目标方法的每一个参数的值是什么;
SpringMVC目标方法能写多少种参数类型。取决于参数解析器argumentResolvers 。
1 2 3 4 5 6 7 8 9 10 11 12 13 14 15 16 17 @Nullable protected ModelAndView invokeHandlerMethod (HttpServletRequest request, HttpServletResponse response, HandlerMethod handlerMethod) throws Exception { ServletWebRequest webRequest = new ServletWebRequest (request, response); try { WebDataBinderFactory binderFactory = getDataBinderFactory(handlerMethod); ModelFactory modelFactory = getModelFactory(handlerMethod, binderFactory); ServletInvocableHandlerMethod invocableMethod = createInvocableHandlerMethod(handlerMethod); if (this .argumentResolvers != null ) { invocableMethod.setHandlerMethodArgumentResolvers(this .argumentResolvers); } ...
参数解析器具体有27种。。。所以我们能写27中请求参数
this.argumentResolvers在afterPropertiesSet()方法内初始化
1 2 3 4 5 6 7 8 9 10 11 12 13 14 15 16 17 18 19 20 21 22 23 24 25 26 27 28 29 30 31 32 33 34 35 36 37 38 39 40 41 42 43 44 45 46 47 48 49 50 51 52 53 54 55 56 57 58 59 60 61 62 63 64 65 public class RequestMappingHandlerAdapter extends AbstractHandlerMethodAdapter implements BeanFactoryAware , InitializingBean { @Nullable private HandlerMethodArgumentResolverComposite argumentResolvers; @Override public void afterPropertiesSet () { ... if (this .argumentResolvers == null ) { List<HandlerMethodArgumentResolver> resolvers = getDefaultArgumentResolvers(); this .argumentResolvers = new HandlerMethodArgumentResolverComposite ().addResolvers(resolvers); } ... } private List<HandlerMethodArgumentResolver> getDefaultArgumentResolvers () { List<HandlerMethodArgumentResolver> resolvers = new ArrayList <>(30 ); resolvers.add(new RequestParamMethodArgumentResolver (getBeanFactory(), false )); resolvers.add(new RequestParamMapMethodArgumentResolver ()); resolvers.add(new PathVariableMethodArgumentResolver ()); resolvers.add(new PathVariableMapMethodArgumentResolver ()); resolvers.add(new MatrixVariableMethodArgumentResolver ()); resolvers.add(new MatrixVariableMapMethodArgumentResolver ()); resolvers.add(new ServletModelAttributeMethodProcessor (false )); resolvers.add(new RequestResponseBodyMethodProcessor (getMessageConverters(), this .requestResponseBodyAdvice)); resolvers.add(new RequestPartMethodArgumentResolver (getMessageConverters(), this .requestResponseBodyAdvice)); resolvers.add(new RequestHeaderMethodArgumentResolver (getBeanFactory())); resolvers.add(new RequestHeaderMapMethodArgumentResolver ()); resolvers.add(new ServletCookieValueMethodArgumentResolver (getBeanFactory())); resolvers.add(new ExpressionValueMethodArgumentResolver (getBeanFactory())); resolvers.add(new SessionAttributeMethodArgumentResolver ()); resolvers.add(new RequestAttributeMethodArgumentResolver ()); resolvers.add(new ServletRequestMethodArgumentResolver ()); resolvers.add(new ServletResponseMethodArgumentResolver ()); resolvers.add(new HttpEntityMethodProcessor (getMessageConverters(), this .requestResponseBodyAdvice)); resolvers.add(new RedirectAttributesMethodArgumentResolver ()); resolvers.add(new ModelMethodProcessor ()); resolvers.add(new MapMethodProcessor ()); resolvers.add(new ErrorsMethodArgumentResolver ()); resolvers.add(new SessionStatusMethodArgumentResolver ()); resolvers.add(new UriComponentsBuilderMethodArgumentResolver ()); if (KotlinDetector.isKotlinPresent()) { resolvers.add(new ContinuationHandlerMethodArgumentResolver ()); } if (getCustomArgumentResolvers() != null ) { resolvers.addAll(getCustomArgumentResolvers()); } resolvers.add(new PrincipalMethodArgumentResolver ()); resolvers.add(new RequestParamMethodArgumentResolver (getBeanFactory(), true )); resolvers.add(new ServletModelAttributeMethodProcessor (true )); return resolvers; } }
HandlerMethodArgumentResolverComposite类如下:(众多参数解析器argumentResolvers 的包装类)。
1 2 3 4 5 6 7 8 9 10 11 12 13 14 15 16 17 public class HandlerMethodArgumentResolverComposite implements HandlerMethodArgumentResolver { private final List<HandlerMethodArgumentResolver> argumentResolvers = new ArrayList <>(); ... public HandlerMethodArgumentResolverComposite addResolvers ( @Nullable HandlerMethodArgumentResolver... resolvers) { if (resolvers != null ) { Collections.addAll(this .argumentResolvers, resolvers); } return this ; } ... }
我们看看HandlerMethodArgumentResolver的源码:
1 2 3 4 5 6 7 8 9 10 11 public interface HandlerMethodArgumentResolver { boolean supportsParameter (MethodParameter parameter) ; @Nullable Object resolveArgument (MethodParameter parameter, @Nullable ModelAndViewContainer mavContainer, NativeWebRequest webRequest, @Nullable WebDataBinderFactory binderFactory) throws Exception;}
返回值处理器 ValueHandler
1 2 3 4 5 6 7 8 9 10 11 12 13 14 15 16 17 18 @Nullable protected ModelAndView invokeHandlerMethod (HttpServletRequest request, HttpServletResponse response, HandlerMethod handlerMethod) throws Exception { ServletWebRequest webRequest = new ServletWebRequest (request, response); try { WebDataBinderFactory binderFactory = getDataBinderFactory(handlerMethod); ModelFactory modelFactory = getModelFactory(handlerMethod, binderFactory); ServletInvocableHandlerMethod invocableMethod = createInvocableHandlerMethod(handlerMethod); if (this .argumentResolvers != null ) { invocableMethod.setHandlerMethodArgumentResolvers(this .argumentResolvers); } if (this .returnValueHandlers != null ) { invocableMethod.setHandlerMethodReturnValueHandlers(this .returnValueHandlers); } ...
返回值处理器有15种。。。所以我们能返回15种返回值
this.returnValueHandlers在afterPropertiesSet()方法内初始化
1 2 3 4 5 6 7 8 9 10 11 12 13 14 15 16 17 18 19 20 21 22 23 24 25 26 27 28 29 30 31 32 33 34 35 36 37 38 39 40 41 42 43 44 45 46 47 48 49 50 51 52 53 54 55 56 57 58 59 60 public class RequestMappingHandlerAdapter extends AbstractHandlerMethodAdapter implements BeanFactoryAware , InitializingBean { @Nullable private HandlerMethodReturnValueHandlerComposite returnValueHandlers; @Override public void afterPropertiesSet () { ... if (this .returnValueHandlers == null ) { List<HandlerMethodReturnValueHandler> handlers = getDefaultReturnValueHandlers(); this .returnValueHandlers = new HandlerMethodReturnValueHandlerComposite ().addHandlers(handlers); } } private List<HandlerMethodReturnValueHandler> getDefaultReturnValueHandlers () { List<HandlerMethodReturnValueHandler> handlers = new ArrayList <>(20 ); handlers.add(new ModelAndViewMethodReturnValueHandler ()); handlers.add(new ModelMethodProcessor ()); handlers.add(new ViewMethodReturnValueHandler ()); handlers.add(new ResponseBodyEmitterReturnValueHandler (getMessageConverters(), this .reactiveAdapterRegistry, this .taskExecutor, this .contentNegotiationManager)); handlers.add(new StreamingResponseBodyReturnValueHandler ()); handlers.add(new HttpEntityMethodProcessor (getMessageConverters(), this .contentNegotiationManager, this .requestResponseBodyAdvice)); handlers.add(new HttpHeadersReturnValueHandler ()); handlers.add(new CallableMethodReturnValueHandler ()); handlers.add(new DeferredResultMethodReturnValueHandler ()); handlers.add(new AsyncTaskMethodReturnValueHandler (this .beanFactory)); handlers.add(new ServletModelAttributeMethodProcessor (false )); handlers.add(new RequestResponseBodyMethodProcessor (getMessageConverters(), this .contentNegotiationManager, this .requestResponseBodyAdvice)); handlers.add(new ViewNameMethodReturnValueHandler ()); handlers.add(new MapMethodProcessor ()); if (getCustomReturnValueHandlers() != null ) { handlers.addAll(getCustomReturnValueHandlers()); } if (!CollectionUtils.isEmpty(getModelAndViewResolvers())) { handlers.add(new ModelAndViewResolverMethodReturnValueHandler (getModelAndViewResolvers())); } else { handlers.add(new ServletModelAttributeMethodProcessor (true )); } return handlers; } }
HandlerMethodReturnValueHandlerComposite类如下:
1 2 3 4 5 6 7 8 9 10 11 12 13 14 15 16 public class HandlerMethodReturnValueHandlerComposite implements HandlerMethodReturnValueHandler { private final List<HandlerMethodReturnValueHandler> returnValueHandlers = new ArrayList <>(); ... public HandlerMethodReturnValueHandlerComposite addHandlers ( @Nullable List<? extends HandlerMethodReturnValueHandler> handlers) { if (handlers != null ) { this .returnValueHandlers.addAll(handlers); } return this ; } }
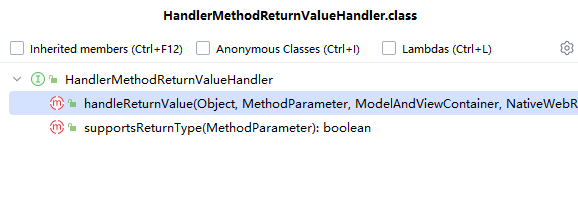
HandlerMethodReturnValueHandler接口:
1 2 3 4 5 6 7 8 public interface HandlerMethodReturnValueHandler { boolean supportsReturnType (MethodParameter returnType) ; void handleReturnValue (@Nullable Object returnValue, MethodParameter returnType, ModelAndViewContainer mavContainer, NativeWebRequest webRequest) throws Exception;}
回顾执行目标方法 1 2 3 4 5 6 public class DispatcherServlet extends FrameworkServlet { ... protected void doDispatch (HttpServletRequest request, HttpServletResponse response) throws Exception { ModelAndView mv = null ; ... mv = ha.handle(processedRequest, response, mappedHandler.getHandler());
RequestMappingHandlerAdapter的handle()方法:
1 2 3 4 5 6 7 8 9 10 11 12 13 14 15 16 17 18 19 20 21 22 public class RequestMappingHandlerAdapter extends AbstractHandlerMethodAdapter implements BeanFactoryAware , InitializingBean { ... public final ModelAndView handle (HttpServletRequest request, HttpServletResponse response, Object handler) throws Exception { return handleInternal(request, response, (HandlerMethod) handler); } @Override protected ModelAndView handleInternal (HttpServletRequest request, HttpServletResponse response, HandlerMethod handlerMethod) throws Exception { ModelAndView mav; mav = invokeHandlerMethod(request, response, handlerMethod); return mav; } }
RequestMappingHandlerAdapter的invokeHandlerMethod()方法:
1 2 3 4 5 6 7 8 9 10 11 12 13 14 15 16 17 18 19 20 21 22 23 24 25 26 27 28 29 30 31 public class RequestMappingHandlerAdapter extends AbstractHandlerMethodAdapter implements BeanFactoryAware , InitializingBean { protected ModelAndView invokeHandlerMethod (HttpServletRequest request, HttpServletResponse response, HandlerMethod handlerMethod) throws Exception { ServletWebRequest webRequest = new ServletWebRequest (request, response); try { ... ServletInvocableHandlerMethod invocableMethod = createInvocableHandlerMethod(handlerMethod); if (this .argumentResolvers != null ) { invocableMethod.setHandlerMethodArgumentResolvers(this .argumentResolvers); } if (this .returnValueHandlers != null ) { invocableMethod.setHandlerMethodReturnValueHandlers(this .returnValueHandlers); } ... invocableMethod.invokeAndHandle(webRequest, mavContainer); if (asyncManager.isConcurrentHandlingStarted()) { return null ; } return getModelAndView(mavContainer, modelFactory, webRequest); } finally { webRequest.requestCompleted(); } }
invokeAndHandle()方法如下:
1 2 3 4 5 6 7 8 9 10 11 12 13 14 15 16 17 18 19 20 21 22 23 24 25 26 27 28 29 30 31 32 33 34 35 36 37 38 39 40 41 42 43 44 45 46 47 48 49 50 51 public class ServletInvocableHandlerMethod extends InvocableHandlerMethod { public void invokeAndHandle (ServletWebRequest webRequest, ModelAndViewContainer mavContainer, Object... providedArgs) throws Exception { Object returnValue = invokeForRequest(webRequest, mavContainer, providedArgs); ... try { this .returnValueHandlers.handleReturnValue( returnValue, getReturnValueType(returnValue), mavContainer, webRequest); } catch (Exception ex) { ... } } @Nullable public Object invokeForRequest (NativeWebRequest request, @Nullable ModelAndViewContainer mavContainer, Object... providedArgs) throws Exception { Object[] args = getMethodArgumentValues(request, mavContainer, providedArgs); ... return doInvoke(args); } @Nullable protected Object doInvoke (Object... args) throws Exception { Method method = getBridgedMethod(); ReflectionUtils.makeAccessible(method); try { if (KotlinDetector.isSuspendingFunction(method)) { return CoroutinesUtils.invokeSuspendingFunction(method, getBean(), args); } return method.invoke(getBean(), args); } catch (IllegalArgumentException ex) { ... } catch (InvocationTargetException ex) { ... } } }
如何确定目标方法每一个参数的值 重点分析ServletInvocableHandlerMethod的getMethodArgumentValues方法
1 2 3 4 5 6 7 8 9 10 11 12 13 14 15 16 17 18 19 20 21 22 23 24 25 26 27 28 29 30 31 32 33 34 35 36 37 38 39 40 41 42 43 44 45 46 47 48 49 public class ServletInvocableHandlerMethod extends InvocableHandlerMethod { ... @Nullable public Object invokeForRequest (NativeWebRequest request, @Nullable ModelAndViewContainer mavContainer, Object... providedArgs) throws Exception { Object[] args = getMethodArgumentValues(request, mavContainer, providedArgs); ... return doInvoke(args); } protected Object[] getMethodArgumentValues(NativeWebRequest request, @Nullable ModelAndViewContainer mavContainer, Object... providedArgs) throws Exception { MethodParameter[] parameters = getMethodParameters(); if (ObjectUtils.isEmpty(parameters)) { return EMPTY_ARGS; } Object[] args = new Object [parameters.length]; for (int i = 0 ; i < parameters.length; i++) { MethodParameter parameter = parameters[i]; parameter.initParameterNameDiscovery(this .parameterNameDiscoverer); args[i] = findProvidedArgument(parameter, providedArgs); if (args[i] != null ) { continue ; } if (!this .resolvers.supportsParameter(parameter)) { throw new IllegalStateException (formatArgumentError(parameter, "No suitable resolver" )); } try { args[i] = this .resolvers.resolveArgument(parameter, mavContainer, request, this .dataBinderFactory); } catch (Exception ex) { .... } } return args; } }
this.resolvers的类型为HandlerMethodArgumentResolverComposite(在参数解析器 章节提及)
1 2 3 4 5 6 7 8 9 10 11 12 13 14 15 16 17 18 19 20 21 22 23 24 25 26 27 28 29 30 31 32 33 34 35 36 37 38 39 public class HandlerMethodArgumentResolverComposite implements HandlerMethodArgumentResolver { @Override public boolean supportsParameter (MethodParameter parameter) { return getArgumentResolver(parameter) != null ; } @Override @Nullable public Object resolveArgument (MethodParameter parameter, @Nullable ModelAndViewContainer mavContainer, NativeWebRequest webRequest, @Nullable WebDataBinderFactory binderFactory) throws Exception { HandlerMethodArgumentResolver resolver = getArgumentResolver(parameter); if (resolver == null ) { throw new IllegalArgumentException ("Unsupported parameter type [" + parameter.getParameterType().getName() + "]. supportsParameter should be called first." ); } return resolver.resolveArgument(parameter, mavContainer, webRequest, binderFactory); } @Nullable private HandlerMethodArgumentResolver getArgumentResolver (MethodParameter parameter) { HandlerMethodArgumentResolver result = this .argumentResolverCache.get(parameter); if (result == null ) { for (HandlerMethodArgumentResolver resolver : this .argumentResolvers) { if (resolver.supportsParameter(parameter)) { result = resolver; this .argumentResolverCache.put(parameter, result); break ; } } } return result; } }
1 2 3 4 5 6 7 8 9 10 11 12 13 14 15 16 17 18 19 20 21 22 23 24 25 26 27 28 29 30 31 32 33 34 35 36 37 38 39 40 41 42 43 44 @Nullable public final Object resolveArgument (MethodParameter parameter, @Nullable ModelAndViewContainer mavContainer, NativeWebRequest webRequest, @Nullable WebDataBinderFactory binderFactory) throws Exception { NamedValueInfo namedValueInfo = this .getNamedValueInfo(parameter); MethodParameter nestedParameter = parameter.nestedIfOptional(); Object resolvedName = this .resolveEmbeddedValuesAndExpressions(namedValueInfo.name); if (resolvedName == null ) { throw new IllegalArgumentException ("Specified name must not resolve to null: [" + namedValueInfo.name + "]" ); } else { Object arg = this .resolveName(resolvedName.toString(), nestedParameter, webRequest); if (arg == null ) { if (namedValueInfo.defaultValue != null ) { arg = this .resolveEmbeddedValuesAndExpressions(namedValueInfo.defaultValue); } else if (namedValueInfo.required && !nestedParameter.isOptional()) { this .handleMissingValue(namedValueInfo.name, nestedParameter, webRequest); } arg = this .handleNullValue(namedValueInfo.name, arg, nestedParameter.getNestedParameterType()); } else if ("" .equals(arg) && namedValueInfo.defaultValue != null ) { arg = this .resolveEmbeddedValuesAndExpressions(namedValueInfo.defaultValue); } if (binderFactory != null ) { WebDataBinder binder = binderFactory.createBinder(webRequest, (Object)null , namedValueInfo.name); try { arg = binder.convertIfNecessary(arg, parameter.getParameterType(), parameter); } catch (ConversionNotSupportedException var11) { throw new MethodArgumentConversionNotSupportedException (arg, var11.getRequiredType(), namedValueInfo.name, parameter, var11.getCause()); } catch (TypeMismatchException var12) { throw new MethodArgumentTypeMismatchException (arg, var12.getRequiredType(), namedValueInfo.name, parameter, var12.getCause()); } if (arg == null && namedValueInfo.defaultValue == null && namedValueInfo.required && !nestedParameter.isOptional()) { this .handleMissingValueAfterConversion(namedValueInfo.name, nestedParameter, webRequest); } } this .handleResolvedValue(arg, namedValueInfo.name, parameter, mavContainer, webRequest); return arg; } }
1 2 3 4 5 6 7 @Nullable protected Object resolveName (String name, MethodParameter parameter, NativeWebRequest request) throws Exception { Map<String, String> uriTemplateVars = (Map)request.getAttribute(HandlerMapping.URI_TEMPLATE_VARIABLES_ATTRIBUTE, 0 ); return uriTemplateVars != null ? uriTemplateVars.get(name) : null ; }
小结 本节描述,一个请求发送到DispatcherServlet后的具体处理流程,也就是SpringMVC的主要原理。
本节内容较多且硬核,对日后编程很有帮助,需耐心对待。
可以运行一个示例,打断点,在Debug模式下,查看程序流程。
33、请求处理-【源码分析】-Servlet API参数解析原理
WebRequest
ServletRequest
MultipartRequest
HttpSession
javax.servlet.http.PushBuilder
Principal
InputStream
Reader
HttpMethod
Locale
TimeZone
ZoneId
ServletRequestMethodArgumentResolver 用来处理以上的参数
1 2 3 4 5 6 7 8 9 10 11 12 13 14 15 16 17 18 19 20 21 22 23 24 25 26 27 28 29 30 31 32 33 34 35 36 37 38 39 40 41 42 43 44 45 46 47 48 49 50 51 52 53 54 55 56 57 58 59 60 61 62 63 64 65 66 67 68 69 70 71 72 73 74 75 76 77 78 79 80 81 82 83 84 85 86 87 88 89 90 91 92 93 94 95 96 97 98 99 100 101 102 103 104 105 106 107 108 109 110 111 112 113 114 115 116 117 118 119 120 121 122 123 124 125 126 127 128 129 130 131 132 133 134 135 136 137 138 139 140 141 public class ServletRequestMethodArgumentResolver implements HandlerMethodArgumentResolver { @Nullable private static Class<?> pushBuilder; static { try { pushBuilder = ClassUtils.forName("javax.servlet.http.PushBuilder" , ServletRequestMethodArgumentResolver.class.getClassLoader()); } catch (ClassNotFoundException ex) { pushBuilder = null ; } } @Override public boolean supportsParameter (MethodParameter parameter) { Class<?> paramType = parameter.getParameterType(); return (WebRequest.class.isAssignableFrom(paramType) || ServletRequest.class.isAssignableFrom(paramType) || MultipartRequest.class.isAssignableFrom(paramType) || HttpSession.class.isAssignableFrom(paramType) || (pushBuilder != null && pushBuilder.isAssignableFrom(paramType)) || (Principal.class.isAssignableFrom(paramType) && !parameter.hasParameterAnnotations()) || InputStream.class.isAssignableFrom(paramType) || Reader.class.isAssignableFrom(paramType) || HttpMethod.class == paramType || Locale.class == paramType || TimeZone.class == paramType || ZoneId.class == paramType); } @Override public Object resolveArgument (MethodParameter parameter, @Nullable ModelAndViewContainer mavContainer, NativeWebRequest webRequest, @Nullable WebDataBinderFactory binderFactory) throws Exception { Class<?> paramType = parameter.getParameterType(); if (WebRequest.class.isAssignableFrom(paramType)) { if (!paramType.isInstance(webRequest)) { throw new IllegalStateException ( "Current request is not of type [" + paramType.getName() + "]: " + webRequest); } return webRequest; } if (ServletRequest.class.isAssignableFrom(paramType) || MultipartRequest.class.isAssignableFrom(paramType)) { return resolveNativeRequest(webRequest, paramType); } return resolveArgument(paramType, resolveNativeRequest(webRequest, HttpServletRequest.class)); } private <T> T resolveNativeRequest (NativeWebRequest webRequest, Class<T> requiredType) { T nativeRequest = webRequest.getNativeRequest(requiredType); if (nativeRequest == null ) { throw new IllegalStateException ( "Current request is not of type [" + requiredType.getName() + "]: " + webRequest); } return nativeRequest; } @Nullable private Object resolveArgument (Class<?> paramType, HttpServletRequest request) throws IOException { if (HttpSession.class.isAssignableFrom(paramType)) { HttpSession session = request.getSession(); if (session != null && !paramType.isInstance(session)) { throw new IllegalStateException ( "Current session is not of type [" + paramType.getName() + "]: " + session); } return session; } else if (pushBuilder != null && pushBuilder.isAssignableFrom(paramType)) { return PushBuilderDelegate.resolvePushBuilder(request, paramType); } else if (InputStream.class.isAssignableFrom(paramType)) { InputStream inputStream = request.getInputStream(); if (inputStream != null && !paramType.isInstance(inputStream)) { throw new IllegalStateException ( "Request input stream is not of type [" + paramType.getName() + "]: " + inputStream); } return inputStream; } else if (Reader.class.isAssignableFrom(paramType)) { Reader reader = request.getReader(); if (reader != null && !paramType.isInstance(reader)) { throw new IllegalStateException ( "Request body reader is not of type [" + paramType.getName() + "]: " + reader); } return reader; } else if (Principal.class.isAssignableFrom(paramType)) { Principal userPrincipal = request.getUserPrincipal(); if (userPrincipal != null && !paramType.isInstance(userPrincipal)) { throw new IllegalStateException ( "Current user principal is not of type [" + paramType.getName() + "]: " + userPrincipal); } return userPrincipal; } else if (HttpMethod.class == paramType) { return HttpMethod.resolve(request.getMethod()); } else if (Locale.class == paramType) { return RequestContextUtils.getLocale(request); } else if (TimeZone.class == paramType) { TimeZone timeZone = RequestContextUtils.getTimeZone(request); return (timeZone != null ? timeZone : TimeZone.getDefault()); } else if (ZoneId.class == paramType) { TimeZone timeZone = RequestContextUtils.getTimeZone(request); return (timeZone != null ? timeZone.toZoneId() : ZoneId.systemDefault()); } throw new UnsupportedOperationException ("Unknown parameter type: " + paramType.getName()); } private static class PushBuilderDelegate { @Nullable public static Object resolvePushBuilder (HttpServletRequest request, Class<?> paramType) { PushBuilder pushBuilder = request.newPushBuilder(); if (pushBuilder != null && !paramType.isInstance(pushBuilder)) { throw new IllegalStateException ( "Current push builder is not of type [" + paramType.getName() + "]: " + pushBuilder); } return pushBuilder; } } }
用例:
1 2 3 4 5 6 7 8 9 10 11 @Controller public class RequestController { @GetMapping("/goto") public String goToPage (HttpServletRequest request) { request.setAttribute("msg" ,"成功了..." ); request.setAttribute("code" ,200 ); return "forward:/success" ; } }
34、请求处理-【源码分析】-Model、Map原理 复杂参数:
Map
Model(map、model里面的数据会被放在request的请求域 request.setAttribute)
Errors/BindingResult
RedirectAttributes( 重定向携带数据)
ServletResponse(response)
SessionStatus
UriComponentsBuilder
ServletUriComponentsBuilder
用例:
1 2 3 4 5 6 7 8 9 10 11 12 13 14 15 16 17 18 19 20 21 22 23 24 25 26 27 28 29 30 31 32 33 34 35 @GetMapping("/params") public String testParam (Map<String,Object> map, Model model, HttpServletRequest request, HttpServletResponse response) { map.put("hello" ,"world666" ); model.addAttribute("world" ,"hello666" ); request.setAttribute("message" ,"HelloWorld" ); Cookie cookie = new Cookie ("c1" ,"v1" ); response.addCookie(cookie); return "forward:/success" ; } @ResponseBody @GetMapping("/success") public Map success (@RequestAttribute(value = "msg",required = false) String msg, @RequestAttribute(value = "code",required = false) Integer code, HttpServletRequest request) { Object msg1 = request.getAttribute("msg" ); Map<String,Object> map = new HashMap <>(); Object hello = request.getAttribute("hello" ); Object world = request.getAttribute("world" ); Object message = request.getAttribute("message" ); map.put("reqMethod_msg" ,msg1); map.put("annotation_msg" ,msg); map.put("hello" ,hello); map.put("world" ,world); map.put("message" ,message); return map; }
上面三位都是可以给request域中放数据,用request.getAttribute()获取
接下来我们看看,Map<String,Object> map与Model model用什么参数处理器。
Map<String,Object> map参数用MapMethodProcessor处理:
1 2 3 4 5 6 7 8 9 10 11 12 13 14 15 16 17 18 19 20 21 public class MapMethodProcessor implements HandlerMethodArgumentResolver , HandlerMethodReturnValueHandler { @Override public boolean supportsParameter (MethodParameter parameter) { return (Map.class.isAssignableFrom(parameter.getParameterType()) && parameter.getParameterAnnotations().length == 0 ); } @Override @Nullable public Object resolveArgument (MethodParameter parameter, @Nullable ModelAndViewContainer mavContainer, NativeWebRequest webRequest, @Nullable WebDataBinderFactory binderFactory) throws Exception { Assert.state(mavContainer != null , "ModelAndViewContainer is required for model exposure" ); return mavContainer.getModel(); } ... }
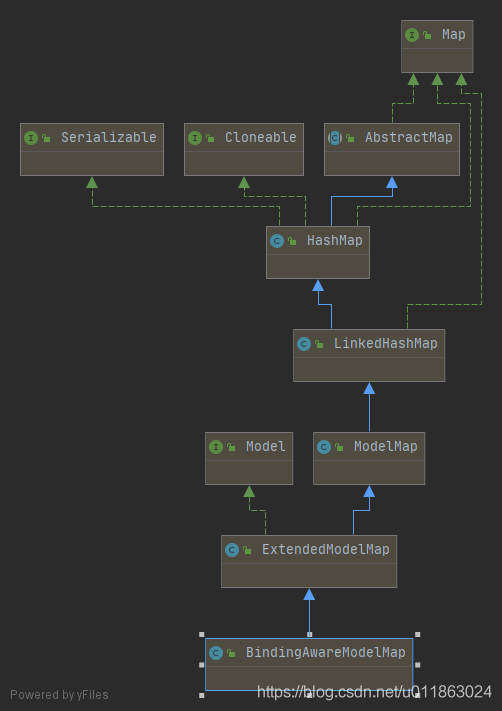
mavContainer.getModel()如下:
1 2 3 4 5 6 7 8 9 10 11 12 13 14 15 16 17 18 19 20 21 22 23 24 25 26 27 28 29 30 31 32 public class ModelAndViewContainer { ... private final ModelMap defaultModel = new BindingAwareModelMap (); @Nullable private ModelMap redirectModel; ... public ModelMap getModel () { if (useDefaultModel()) { return this .defaultModel; } else { if (this .redirectModel == null ) { this .redirectModel = new ModelMap (); } return this .redirectModel; } } private boolean useDefaultModel () { return (!this .redirectModelScenario || (this .redirectModel == null && !this .ignoreDefaultModelOnRedirect)); } ... }
Model model用ModelMethodProcessor处理:
1 2 3 4 5 6 7 8 9 10 11 12 13 14 15 16 17 public class ModelMethodProcessor implements HandlerMethodArgumentResolver , HandlerMethodReturnValueHandler { @Override public boolean supportsParameter (MethodParameter parameter) { return Model.class.isAssignableFrom(parameter.getParameterType()); } @Override @Nullable public Object resolveArgument (MethodParameter parameter, @Nullable ModelAndViewContainer mavContainer, NativeWebRequest webRequest, @Nullable WebDataBinderFactory binderFactory) throws Exception { Assert.state(mavContainer != null , "ModelAndViewContainer is required for model exposure" ); return mavContainer.getModel(); } ... }
return mavContainer.getModel();这跟MapMethodProcessor的一致
可以得出model和map返回的都是BindingAwareModelMap对象,BindingAwareModelMap既是model也是mapModel也是另一种意义的Map。
1 2 3 4 5 6 7 8 9 10 11 12 13 14 15 16 17 18 19 20 21 22 23 24 25 26 27 28 29 30 31 32 public void invokeAndHandle (ServletWebRequest webRequest, ModelAndViewContainer mavContainer, Object... providedArgs) throws Exception { Object returnValue = this .invokeForRequest(webRequest, mavContainer, providedArgs); this .setResponseStatus(webRequest); if (returnValue == null ) { if (this .isRequestNotModified(webRequest) || this .getResponseStatus() != null || mavContainer.isRequestHandled()) { this .disableContentCachingIfNecessary(webRequest); mavContainer.setRequestHandled(true ); return ; } } else if (StringUtils.hasText(this .getResponseStatusReason())) { mavContainer.setRequestHandled(true ); return ; } mavContainer.setRequestHandled(false ); Assert.state(this .returnValueHandlers != null , "No return value handlers" ); try { this .returnValueHandlers.handleReturnValue(returnValue, this .getReturnValueType(returnValue), mavContainer, webRequest); } catch (Exception var6) { if (logger.isTraceEnabled()) { logger.trace(this .formatErrorForReturnValue(returnValue), var6); } throw var6; } }
第一步会先获取返回结果的类型
1 2 3 public MethodParameter getReturnValueType (@Nullable Object returnValue) { return new ReturnValueMethodParameter (returnValue); }
第二步
1 2 3 4 5 6 7 8 9 10 public void handleReturnValue (@Nullable Object returnValue, MethodParameter returnType, ModelAndViewContainer mavContainer, NativeWebRequest webRequest) throws Exception { HandlerMethodReturnValueHandler handler = this .selectHandler(returnValue, returnType); if (handler == null ) { throw new IllegalArgumentException ("Unknown return value type: " + returnType.getParameterType().getName()); } else { handler.handleReturnValue(returnValue, returnType, mavContainer, webRequest); } }
1 2 3 4 5 6 7 8 9 10 11 12 13 14 15 16 17 18 19 public void handleReturnValue (@Nullable Object returnValue, MethodParameter returnType, ModelAndViewContainer mavContainer, NativeWebRequest webRequest) throws Exception { if (returnValue instanceof CharSequence) { String viewName = returnValue.toString(); mavContainer.setViewName(viewName); if (this .isRedirectViewName(viewName)) { mavContainer.setRedirectModelScenario(true ); } } else if (returnValue != null ) { String var10002 = returnType.getParameterType().getName(); throw new UnsupportedOperationException ("Unexpected return type: " + var10002 + " in method: " + returnType.getMethod()); } }
接下来看看 Map<String,Object> map与Model model值是如何做到用request.getAttribute()获取的。
众所周知,所有的数据都放在 ModelAndView 包含要去的页面地址View,还包含Model数据。
先看ModelAndView 接下来是如何处理的?
当controller方法执行完毕后悔返回到invokeHandlerMethod中兵返回mav对象(已经封装成mavContainer)
1 2 3 4 5 6 7 8 9 10 11 12 13 14 15 16 17 18 19 20 21 22 23 24 25 26 @Nullable protected ModelAndView invokeHandlerMethod (HttpServletRequest request, HttpServletResponse response, HandlerMethod handlerMethod) throws Exception { ServletWebRequest webRequest = new ServletWebRequest (request, response); try { ... ServletInvocableHandlerMethod invocableMethod = createInvocableHandlerMethod(handlerMethod); if (this .argumentResolvers != null ) { invocableMethod.setHandlerMethodArgumentResolvers(this .argumentResolvers); } if (this .returnValueHandlers != null ) { invocableMethod.setHandlerMethodReturnValueHandlers(this .returnValueHandlers); } ... invocableMethod.invokeAndHandle(webRequest, mavContainer); return asyncManager.isConcurrentHandlingStarted() ? null : this .getModelAndView(mavContainer, modelFactory, webRequest); }
1 2 3 4 5 6 7 8 9 10 11 12 13 14 15 16 17 18 19 20 21 22 23 24 25 26 27 28 29 30 31 32 33 34 35 36 37 38 39 40 41 42 43 44 45 46 47 48 49 50 51 52 53 54 55 56 57 58 59 60 61 62 63 64 65 66 67 68 69 70 71 72 73 74 75 76 77 78 79 public class DispatcherServlet extends FrameworkServlet { ... protected void doDispatch (HttpServletRequest request, HttpServletResponse response) throws Exception { ... try { ModelAndView mv = null ; ... mv = ha.handle(processedRequest, response, mappedHandler.getHandler()); ... } catch (Exception ex) { dispatchException = ex; } catch (Throwable err) { dispatchException = new NestedServletException ("Handler dispatch failed" , err); } processDispatchResult(processedRequest, response, mappedHandler, mv, dispatchException); } ... } private void processDispatchResult (HttpServletRequest request, HttpServletResponse response, @Nullable HandlerExecutionChain mappedHandler, @Nullable ModelAndView mv, @Nullable Exception exception) throws Exception { ... if (mv != null && !mv.wasCleared()) { render(mv, request, response); ... } ... } protected void render (ModelAndView mv, HttpServletRequest request, HttpServletResponse response) throws Exception { ... View view; String viewName = mv.getViewName(); if (viewName != null ) { view = resolveViewName(viewName, mv.getModelInternal(), locale, request); if (view == null ) { throw new ServletException ("Could not resolve view with name '" + mv.getViewName() + "' in servlet with name '" + getServletName() + "'" ); } } else { view = mv.getView(); if (view == null ) { throw new ServletException ("ModelAndView [" + mv + "] neither contains a view name nor a " + "View object in servlet with name '" + getServletName() + "'" ); } } view.render(mv.getModelInternal(), request, response); ... } }
进入该方法第一步获取model模型
1 2 3 4 @Nullable protected Map<String, Object> getModelInternal () { return this .model; }
1 2 3 4 5 6 7 8 9 10 11 12 13 14 15 16 17 18 @Nullable protected View resolveViewName (String viewName, @Nullable Map<String, Object> model, Locale locale, HttpServletRequest request) throws Exception { if (this .viewResolvers != null ) { Iterator var5 = this .viewResolvers.iterator(); while (var5.hasNext()) { ViewResolver viewResolver = (ViewResolver)var5.next(); View view = viewResolver.resolveViewName(viewName, locale); if (view != null ) { return view; } } } return null ; }
1 2 3 4 5 6 7 8 9 10 11 12 13 14 15 16 17 18 19 20 21 22 23 24 25 26 27 28 29 30 31 @Nullable public View resolveViewName (String viewName, Locale locale) throws Exception { RequestAttributes attrs = RequestContextHolder.getRequestAttributes(); Assert.state(attrs instanceof ServletRequestAttributes, "No current ServletRequestAttributes" ); List<MediaType> requestedMediaTypes = this .getMediaTypes(((ServletRequestAttributes)attrs).getRequest()); if (requestedMediaTypes != null ) { List<View> candidateViews = this .getCandidateViews(viewName, locale, requestedMediaTypes); View bestView = this .getBestView(candidateViews, requestedMediaTypes, attrs); if (bestView != null ) { return bestView; } } String mediaTypeInfo = this .logger.isDebugEnabled() && requestedMediaTypes != null ? " given " + requestedMediaTypes.toString() : "" ; if (this .useNotAcceptableStatusCode) { if (this .logger.isDebugEnabled()) { this .logger.debug("Using 406 NOT_ACCEPTABLE" + mediaTypeInfo); } return NOT_ACCEPTABLE_VIEW; } else { this .logger.debug("View remains unresolved" + mediaTypeInfo); return null ; } }
到此,视图解析到一段落
回到view.render(mv.getModelInternal(), request, response);这个方法内部,进行视图渲染
1 2 3 4 5 6 7 8 9 10 11 12 13 public void render (@Nullable Map<String, ?> model, HttpServletRequest request, HttpServletResponse response) throws Exception { if (this .logger.isDebugEnabled()) { Log var10000 = this .logger; String var10001 = this .formatViewName(); var10000.debug("View " + var10001 + ", model " + (model != null ? model : Collections.emptyMap()) + (this .staticAttributes.isEmpty() ? "" : ", static attributes " + this .staticAttributes)); } Map<String, Object> mergedModel = this .createMergedOutputModel(model, request, response); this .prepareResponse(request, response); this .renderMergedOutputModel(mergedModel, this .getRequestToExpose(request), response); }
1 2 3 4 5 6 7 8 9 10 11 12 13 14 15 16 17 18 19 20 21 22 23 24 25 26 protected Map<String, Object> createMergedOutputModel (@Nullable Map<String, ?> model, HttpServletRequest request, HttpServletResponse response) { Map<String, Object> pathVars = this .exposePathVariables ? (Map)request.getAttribute(View.PATH_VARIABLES) : null ; int size = this .staticAttributes.size(); size += model != null ? model.size() : 0 ; size += pathVars != null ? pathVars.size() : 0 ; Map<String, Object> mergedModel = CollectionUtils.newLinkedHashMap(size); mergedModel.putAll(this .staticAttributes); if (pathVars != null ) { mergedModel.putAll(pathVars); } if (model != null ) { mergedModel.putAll(model); } if (this .requestContextAttribute != null ) { mergedModel.put(this .requestContextAttribute, this .createRequestContext(request, response, mergedModel)); } return mergedModel; }
上述核心渲染步骤!!!进入该方法:
1 this .renderMergedOutputModel(mergedModel, this .getRequestToExpose(request), response);
第一步:
1 2 3 4 5 6 7 8 9 10 protected HttpServletRequest getRequestToExpose (HttpServletRequest originalRequest) { if (!this .exposeContextBeansAsAttributes && this .exposedContextBeanNames == null ) { return originalRequest; } else { WebApplicationContext wac = this .getWebApplicationContext(); Assert.state(wac != null , "No WebApplicationContext" ); return new ContextExposingHttpServletRequest (originalRequest, wac, this .exposedContextBeanNames); } }
第二步:
1 2 3 4 5 6 7 8 9 10 11 12 13 14 15 16 17 18 19 20 21 22 23 24 25 26 27 protected void renderMergedOutputModel (Map<String, Object> model, HttpServletRequest request, HttpServletResponse response) throws Exception { this .exposeModelAsRequestAttributes(model, request); this .exposeHelpers(request); String dispatcherPath = this .prepareForRendering(request, response); RequestDispatcher rd = this .getRequestDispatcher(request, dispatcherPath); if (rd == null ) { throw new ServletException ("Could not get RequestDispatcher for [" + this .getUrl() + "]: Check that the corresponding file exists within your web application archive!" ); } else { if (this .useInclude(request, response)) { response.setContentType(this .getContentType()); if (this .logger.isDebugEnabled()) { this .logger.debug("Including [" + this .getUrl() + "]" ); } rd.include(request, response); } else { if (this .logger.isDebugEnabled()) { this .logger.debug("Forwarding to [" + this .getUrl() + "]" ); } rd.forward(request, response); } } }
在Debug模式下,view属为InternalResourceView类。
1 2 3 4 5 6 7 8 9 10 11 12 13 14 15 16 17 18 19 20 21 22 23 24 25 26 27 28 29 30 31 32 33 34 35 36 37 38 39 40 41 42 43 44 45 46 47 48 49 50 public class InternalResourceView extends AbstractUrlBasedView { @Override public void render (@Nullable Map<String, ?> model, HttpServletRequest request, HttpServletResponse response) throws Exception { ... Map<String, Object> mergedModel = createMergedOutputModel(model, request, response); prepareResponse(request, response); renderMergedOutputModel(mergedModel, getRequestToExpose(request), response); } @Override protected void renderMergedOutputModel ( Map<String, Object> model, HttpServletRequest request, HttpServletResponse response) throws Exception { exposeModelAsRequestAttributes(model, request); exposeHelpers(request); String dispatcherPath = prepareForRendering(request, response); RequestDispatcher rd = getRequestDispatcher(request, dispatcherPath); ... } protected void exposeModelAsRequestAttributes (Map<String, Object> model, HttpServletRequest request) throws Exception { model.forEach((name, value) -> { if (value != null ) { request.setAttribute(name, value); } else { request.removeAttribute(name); } }); } }
exposeModelAsRequestAttributes方法看出,Map<String,Object> map,Model model这两种类型数据可以给request域中放数据,用request.getAttribute()获取。
35、请求处理-【源码分析】-自定义参数绑定原理 1 2 3 4 5 6 7 8 9 10 11 12 13 @RestController public class ParameterTestController { @PostMapping("/saveuser") public Person saveuser (Person person) { return person; } }
1 2 3 4 5 6 7 8 9 10 11 12 13 14 15 16 17 18 19 20 21 22 23 24 @Data public class Person { private String userName; private Integer age; private Date birth; private Pet pet; } @Data public class Pet { private String name; private String age; }
封装过程用到ServletModelAttributeMethodProcessor
1 2 3 4 5 6 7 8 9 10 11 12 13 14 15 16 17 18 19 20 21 22 23 24 25 26 27 28 29 30 31 32 33 34 35 36 37 38 39 40 41 42 43 44 45 46 47 48 49 50 51 52 53 54 55 56 57 58 59 60 61 62 63 64 65 66 67 68 69 70 71 72 public class ServletModelAttributeMethodProcessor extends ModelAttributeMethodProcessor { @Override public boolean supportsParameter (MethodParameter parameter) { return (parameter.hasParameterAnnotation(ModelAttribute.class) || (this .annotationNotRequired && !BeanUtils.isSimpleProperty(parameter.getParameterType()))); } @Override @Nullable public final Object resolveArgument (MethodParameter parameter, @Nullable ModelAndViewContainer mavContainer, NativeWebRequest webRequest, @Nullable WebDataBinderFactory binderFactory) throws Exception { ... String name = ModelFactory.getNameForParameter(parameter); ModelAttribute ann = parameter.getParameterAnnotation(ModelAttribute.class); if (ann != null ) { mavContainer.setBinding(name, ann.binding()); } Object attribute = null ; BindingResult bindingResult = null ; if (mavContainer.containsAttribute(name)) { attribute = mavContainer.getModel().get(name); } else { try { attribute = createAttribute(name, parameter, binderFactory, webRequest); } catch (BindException ex) { ... } } if (bindingResult == null ) { WebDataBinder binder = binderFactory.createBinder(webRequest, attribute, name); if (binder.getTarget() != null ) { if (!mavContainer.isBindingDisabled(name)) { bindRequestParameters(binder, webRequest); } validateIfApplicable(binder, parameter); if (binder.getBindingResult().hasErrors() && isBindExceptionRequired(binder, parameter)) { throw new BindException (binder.getBindingResult()); } } if (!parameter.getParameterType().isInstance(attribute)) { attribute = binder.convertIfNecessary(binder.getTarget(), parameter.getParameterType(), parameter); } bindingResult = binder.getBindingResult(); } Map<String, Object> bindingResultModel = bindingResult.getModel(); mavContainer.removeAttributes(bindingResultModel); mavContainer.addAllAttributes(bindingResultModel); return attribute; } }
converters:124种
我们来研究一下!BeanUtils.isSimpleProperty(parameter.getParameterType())这个判断
1 2 3 4 5 6 7 8 9 10 11 12 13 14 15 16 17 18 public Class<?> getParameterType() { Class<?> paramType = this .parameterType; if (paramType != null ) { return paramType; } else { if (this .getContainingClass() != this .getDeclaringClass()) { paramType = ResolvableType.forMethodParameter(this , (Type)null , 1 ).resolve(); } if (paramType == null ) { paramType = this .computeParameterType(); } this .parameterType = paramType; return paramType; } }
第二步:
1 2 3 4 5 6 7 8 9 10 11 12 13 14 15 16 17 18 19 20 21 22 23 24 public static boolean isSimpleProperty (Class<?> type) { Assert.notNull(type, "'type' must not be null" ); return isSimpleValueType(type) || type.isArray() && isSimpleValueType(type.getComponentType()); } public static boolean isSimpleValueType (Class<?> type) { return Void.class != type && Void.TYPE != type && (ClassUtils.isPrimitiveOrWrapper(type) || Enum.class.isAssignableFrom(type) || CharSequence.class.isAssignableFrom(type) || Number.class.isAssignableFrom(type) || Date.class.isAssignableFrom(type) || Temporal.class.isAssignableFrom(type) || URI.class == type || URL.class == type || Locale.class == type || Class.class == type); }
WebDataBinder 利用它里面的 Converters 将请求数据转换成指定的数据类型。再次封装到JavaBean中
在过程当中,用到GenericConversionService:在设置每一个值的时候,找它里面的所有converter那个可以将这个数据类型(request带来参数的字符串)转换到指定的类型
我们在研究一下关键点方法bindRequestParameters(binder, webRequest)
1 2 3 4 5 6 7 8 9 10 11 12 public class ServletModelAttributeMethodProcessor extends ModelAttributeMethodProcessor { protected void bindRequestParameters (WebDataBinder binder, NativeWebRequest request) { ServletRequest servletRequest = (ServletRequest)request.getNativeRequest(ServletRequest.class); Assert.state(servletRequest != null , "No ServletRequest" ); ServletRequestDataBinder servletBinder = (ServletRequestDataBinder)binder; servletBinder.bind(servletRequest); } }
1 2 3 4 5 6 7 8 9 10 11 12 13 14 15 16 17 18 19 20 21 public class ServletRequestDataBinder extends WebDataBinder { public void bind (ServletRequest request) { MutablePropertyValues mpvs = new ServletRequestParameterPropertyValues (request); MultipartRequest multipartRequest = (MultipartRequest)WebUtils.getNativeRequest(request, MultipartRequest.class); if (multipartRequest != null ) { this .bindMultipart(multipartRequest.getMultiFileMap(), mpvs); } else if (StringUtils.startsWithIgnoreCase(request.getContentType(), "multipart/form-data" )) { HttpServletRequest httpServletRequest = (HttpServletRequest)WebUtils.getNativeRequest(request, HttpServletRequest.class); if (httpServletRequest != null && HttpMethod.POST.matches(httpServletRequest.getMethod())) { StandardServletPartUtils.bindParts(httpServletRequest, mpvs, this .isBindEmptyMultipartFiles()); } } this .addBindValues(mpvs, request); this .doBind(mpvs); } }
1 2 3 4 5 6 7 8 9 10 11 12 13 14 15 16 public class WebDataBinder extends DataBinder { public static final String DEFAULT_FIELD_MARKER_PREFIX = "_" ; public static final String DEFAULT_FIELD_DEFAULT_PREFIX = "!" ; @Nullable private String fieldMarkerPrefix = DEFAULT_FIELD_MARKER_PREFIX; @Nullable private String fieldDefaultPrefix = DEFAULT_FIELD_DEFAULT_PREFIX; ... protected void doBind (MutablePropertyValues mpvs) { this .checkFieldDefaults(mpvs); this .checkFieldMarkers(mpvs); this .adaptEmptyArrayIndices(mpvs); super .doBind(mpvs); } ... }
1 2 3 4 5 6 7 8 9 10 public class DataBinder implements PropertyEditorRegistry , TypeConverter { ... protected void doBind (MutablePropertyValues mpvs) { this .checkAllowedFields(mpvs); this .checkRequiredFields(mpvs); this .applyPropertyValues(mpvs); } ... }
1 2 3 4 5 6 7 8 9 10 11 12 13 14 15 16 17 18 19 public class DataBinder implements PropertyEditorRegistry , TypeConverter { ... protected void applyPropertyValues (MutablePropertyValues mpvs) { try { this .getPropertyAccessor().setPropertyValues(mpvs, this .isIgnoreUnknownFields(), this .isIgnoreInvalidFields()); } catch (PropertyBatchUpdateException var7) { PropertyAccessException[] var3 = var7.getPropertyAccessExceptions(); int var4 = var3.length; for (int var5 = 0 ; var5 < var4; ++var5) { PropertyAccessException pae = var3[var5]; this .getBindingErrorProcessor().processPropertyAccessException(pae, this .getInternalBindingResult()); } } } ... }
1 2 3 4 5 6 7 8 9 10 11 12 13 14 15 16 17 18 19 20 21 22 23 24 25 26 27 28 29 30 31 32 33 34 35 36 37 38 39 40 41 42 43 44 45 46 47 48 49 50 51 52 53 public void setPropertyValues (PropertyValues pvs, boolean ignoreUnknown, boolean ignoreInvalid) throws BeansException { List<PropertyAccessException> propertyAccessExceptions = null ; List var10000; if (pvs instanceof MutablePropertyValues mpvs) { var10000 = mpvs.getPropertyValueList(); } else { var10000 = Arrays.asList(pvs.getPropertyValues()); } List<PropertyValue> propertyValues = var10000; if (ignoreUnknown) { this .suppressNotWritablePropertyException = true ; } try { Iterator var18 = propertyValues.iterator(); while (var18.hasNext()) { PropertyValue pv = (PropertyValue)var18.next(); try { this .setPropertyValue(pv); } catch (NotWritablePropertyException var14) { if (!ignoreUnknown) { throw var14; } } catch (NullValueInNestedPathException var15) { if (!ignoreInvalid) { throw var15; } } catch (PropertyAccessException var16) { if (propertyAccessExceptions == null ) { propertyAccessExceptions = new ArrayList (); } propertyAccessExceptions.add(var16); } } } finally { if (ignoreUnknown) { this .suppressNotWritablePropertyException = false ; } } if (propertyAccessExceptions != null ) { PropertyAccessException[] paeArray = (PropertyAccessException[])propertyAccessExceptions.toArray(new PropertyAccessException [0 ]); throw new PropertyBatchUpdateException (paeArray); } }
1 2 3 4 5 6 7 8 9 10 11 12 13 14 15 16 17 18 19 20 21 22 23 24 25 26 27 28 29 30 31 32 33 34 35 36 37 38 39 40 41 42 43 44 45 46 47 48 49 50 51 52 53 54 55 56 57 58 59 60 61 62 63 64 65 66 67 68 69 70 71 72 73 74 75 76 77 78 79 80 81 82 83 84 85 86 87 88 89 90 91 92 93 94 95 96 97 98 99 100 101 102 103 104 105 106 107 108 109 public abstract class AbstractNestablePropertyAccessor extends AbstractPropertyAccessor { ... public void setPropertyValue (PropertyValue pv) throws BeansException { PropertyTokenHolder tokens = (PropertyTokenHolder)pv.resolvedTokens; if (tokens == null ) { String propertyName = pv.getName(); AbstractNestablePropertyAccessor nestedPa; try { nestedPa = this .getPropertyAccessorForPropertyPath(propertyName); } catch (NotReadablePropertyException var6) { throw new NotWritablePropertyException (this .getRootClass(), this .nestedPath + propertyName, "Nested property in path '" + propertyName + "' does not exist" , var6); } tokens = this .getPropertyNameTokens(this .getFinalPath(nestedPa, propertyName)); if (nestedPa == this ) { pv.getOriginalPropertyValue().resolvedTokens = tokens; } nestedPa.setPropertyValue(tokens, pv); } else { this .setPropertyValue(tokens, pv); } } ... protected void setPropertyValue (PropertyTokenHolder tokens, PropertyValue pv) throws BeansException { if (tokens.keys != null ) { this .processKeyedProperty(tokens, pv); } else { this .processLocalProperty(tokens, pv); } } ... private void processLocalProperty (PropertyTokenHolder tokens, PropertyValue pv) { PropertyHandler ph = this .getLocalPropertyHandler(tokens.actualName); if (ph != null && ph.isWritable()) { Object oldValue = null ; PropertyChangeEvent propertyChangeEvent; try { Object originalValue = pv.getValue(); Object valueToApply = originalValue; if (!Boolean.FALSE.equals(pv.conversionNecessary)) { if (pv.isConverted()) { valueToApply = pv.getConvertedValue(); } else { if (this .isExtractOldValueForEditor() && ph.isReadable()) { try { oldValue = ph.getValue(); } catch (Exception var9) { Exception ex = var9; if (var9 instanceof PrivilegedActionException) { PrivilegedActionException pae = (PrivilegedActionException)var9; ex = pae.getException(); } if (logger.isDebugEnabled()) { logger.debug("Could not read previous value of property '" + this .nestedPath + tokens.canonicalName + "'" , ex); } } } valueToApply = this .convertForProperty(tokens.canonicalName, oldValue, originalValue, ph.toTypeDescriptor()); } pv.getOriginalPropertyValue().conversionNecessary = valueToApply != originalValue; } ph.setValue(valueToApply); } catch (TypeMismatchException var10) { throw var10; } catch (InvocationTargetException var11) { propertyChangeEvent = new PropertyChangeEvent (this .getRootInstance(), this .nestedPath + tokens.canonicalName, oldValue, pv.getValue()); if (var11.getTargetException() instanceof ClassCastException) { throw new TypeMismatchException (propertyChangeEvent, ph.getPropertyType(), var11.getTargetException()); } else { Throwable cause = var11.getTargetException(); if (cause instanceof UndeclaredThrowableException) { cause = cause.getCause(); } throw new MethodInvocationException (propertyChangeEvent, cause); } } catch (Exception var12) { propertyChangeEvent = new PropertyChangeEvent (this .getRootInstance(), this .nestedPath + tokens.canonicalName, oldValue, pv.getValue()); throw new MethodInvocationException (propertyChangeEvent, var12); } } else if (pv.isOptional()) { if (logger.isDebugEnabled()) { String var10001 = tokens.actualName; logger.debug("Ignoring optional value for property '" + var10001 + "' - property not found on bean class [" + this .getRootClass().getName() + "]" ); } } else if (!this .suppressNotWritablePropertyException) { throw this .createNotWritablePropertyException(tokens.canonicalName); } } }
第一步
1 2 3 4 5 6 public class BeanWrapperImpl extends AbstractNestablePropertyAccessor implements BeanWrapper { public TypeDescriptor toTypeDescriptor () { return new TypeDescriptor (BeanWrapperImpl.this .property(this .pd)); } }
第二步
1 2 3 4 5 6 7 8 9 public abstract class AbstractNestablePropertyAccessor extends AbstractPropertyAccessor { ... @Nullable protected Object convertForProperty (String propertyName, @Nullable Object oldValue, @Nullable Object newValue, TypeDescriptor td) throws TypeMismatchException { return this .convertIfNecessary(propertyName, oldValue, newValue, td.getType(), td); } ... }
第三步
1 2 3 4 5 6 7 8 9 10 11 12 13 14 15 16 17 18 19 20 public abstract class AbstractNestablePropertyAccessor extends AbstractPropertyAccessor { ... @Nullable private Object convertIfNecessary (@Nullable String propertyName, @Nullable Object oldValue, @Nullable Object newValue, @Nullable Class<?> requiredType, @Nullable TypeDescriptor td) throws TypeMismatchException { Assert.state(this .typeConverterDelegate != null , "No TypeConverterDelegate" ); PropertyChangeEvent pce; try { return this .typeConverterDelegate.convertIfNecessary(propertyName, oldValue, newValue, requiredType, td); } catch (IllegalStateException | ConverterNotFoundException var8) { pce = new PropertyChangeEvent (this .getRootInstance(), this .nestedPath + propertyName, oldValue, newValue); throw new ConversionNotSupportedException (pce, requiredType, var8); } catch (IllegalArgumentException | ConversionException var9) { pce = new PropertyChangeEvent (this .getRootInstance(), this .nestedPath + propertyName, oldValue, newValue); throw new TypeMismatchException (pce, requiredType, var9); } } ... }
第四步
1 2 3 4 5 6 7 8 9 10 11 12 13 14 15 16 17 18 19 20 21 22 23 class TypeConverterDelegate { public <T> T convertIfNecessary (@Nullable String propertyName, @Nullable Object oldValue, @Nullable Object newValue, @Nullable Class<T> requiredType, @Nullable TypeDescriptor typeDescriptor) throws IllegalArgumentException { PropertyEditor editor = this .propertyEditorRegistry.findCustomEditor(requiredType, propertyName); ConversionFailedException conversionAttemptEx = null ; ConversionService conversionService = this .propertyEditorRegistry.getConversionService(); if (editor == null && conversionService != null && newValue != null && typeDescriptor != null ) { TypeDescriptor sourceTypeDesc = TypeDescriptor.forObject(newValue); if (conversionService.canConvert(sourceTypeDesc, typeDescriptor)) { try { return conversionService.convert(newValue, sourceTypeDesc, typeDescriptor); } catch (ConversionFailedException var16) { conversionAttemptEx = var16; } } } ... } ... }
第五步
1 2 3 4 5 6 7 8 9 10 11 12 13 14 15 16 17 18 19 20 21 22 23 24 25 26 27 28 29 30 31 32 33 34 35 36 37 38 39 40 41 42 43 44 45 46 47 48 49 50 51 52 53 54 55 56 57 58 59 60 61 62 63 64 65 66 67 68 69 70 public class GenericConversionService implements ConfigurableConversionService { public boolean canConvert (@Nullable TypeDescriptor sourceType, TypeDescriptor targetType) { Assert.notNull(targetType, "Target type to convert to cannot be null" ); if (sourceType == null ) { return true ; } else { GenericConverter converter = this .getConverter(sourceType, targetType); return converter != null ; } } ... @Nullable protected GenericConverter getConverter (TypeDescriptor sourceType, TypeDescriptor targetType) { ConverterCacheKey key = new ConverterCacheKey (sourceType, targetType); GenericConverter converter = (GenericConverter)this .converterCache.get(key); if (converter != null ) { return converter != NO_MATCH ? converter : null ; } else { converter = this .converters.find(sourceType, targetType); if (converter == null ) { converter = this .getDefaultConverter(sourceType, targetType); } if (converter != null ) { this .converterCache.put(key, converter); return converter; } else { this .converterCache.put(key, NO_MATCH); return null ; } } } ... @Nullable public GenericConverter find (TypeDescriptor sourceType, TypeDescriptor targetType) { List<Class<?>> sourceCandidates = this .getClassHierarchy(sourceType.getType()); List<Class<?>> targetCandidates = this .getClassHierarchy(targetType.getType()); Iterator var5 = sourceCandidates.iterator(); while (var5.hasNext()) { Class<?> sourceCandidate = (Class)var5.next(); Iterator var7 = targetCandidates.iterator(); while (var7.hasNext()) { Class<?> targetCandidate = (Class)var7.next(); GenericConverter.ConvertiblePair convertiblePair = new GenericConverter .ConvertiblePair(sourceCandidate, targetCandidate); GenericConverter converter = this .getRegisteredConverter(sourceType, targetType, convertiblePair); if (converter != null ) { return converter; } } } return null ; } }
至此 ,if (conversionService.canConvert(sourceTypeDesc, typeDescriptor)) 方法执行结束。
1 2 3 4 5 6 7 8 9 10 11 12 13 14 15 16 17 18 19 20 21 22 23 24 public class GenericConversionService implements ConfigurableConversionService { ... @Nullable public Object convert (@Nullable Object source, @Nullable TypeDescriptor sourceType, TypeDescriptor targetType) { Assert.notNull(targetType, "Target type to convert to cannot be null" ); if (sourceType == null ) { Assert.isTrue(source == null , "Source must be [null] if source type == [null]" ); return this .handleResult((TypeDescriptor)null , targetType, this .convertNullSource((TypeDescriptor)null , targetType)); } else if (source != null && !sourceType.getObjectType().isInstance(source)) { throw new IllegalArgumentException ("Source to convert from must be an instance of [" + sourceType + "]; instead it was a [" + source.getClass().getName() + "]" ); } else { GenericConverter converter = this .getConverter(sourceType, targetType); if (converter != null ) { Object result = ConversionUtils.invokeConverter(converter, source, sourceType, targetType); return this .handleResult(sourceType, targetType, result); } else { return this .handleConverterNotFound(source, sourceType, targetType); } } } ... }
第二步
1 2 3 4 5 6 7 8 9 10 11 12 13 14 15 abstract class ConversionUtils { ... @Nullable public static Object invokeConverter (GenericConverter converter, @Nullable Object source, TypeDescriptor sourceType, TypeDescriptor targetType) { try { return converter.convert(source, sourceType, targetType); } catch (ConversionFailedException var5) { throw var5; } catch (Throwable var6) { throw new ConversionFailedException (sourceType, targetType, source, var6); } } ... }
第三步
1 2 3 4 5 6 7 8 9 public class GenericConversionService implements ConfigurableConversionService { ... @Nullable public Object convert (@Nullable Object source, TypeDescriptor sourceType, TypeDescriptor targetType) { return source == null ? GenericConversionService.this .convertNullSource(sourceType, targetType) : this .converterFactory.getConverter(targetType.getObjectType()).convert(source); } ... }
第四步
1 2 3 4 5 6 7 8 9 10 11 12 13 14 15 16 17 public Class<?> getObjectType() { return ClassUtils.resolvePrimitiveIfNecessary(this .getType()); } public <T extends Number > Converter<String, T> getConverter (Class<T> targetType) { return new StringToNumber (targetType); } ... @Nullable public T convert (String source) { return source.isEmpty() ? null : NumberUtils.parseNumber(source, this .targetType); }
1 2 3 4 5 6 7 8 9 10 11 12 13 14 15 16 17 18 19 20 21 22 23 24 25 26 27 28 29 30 public abstract class NumberUtils { ... public static <T extends Number > T parseNumber (String text, Class<T> targetClass) { Assert.notNull(text, "Text must not be null" ); Assert.notNull(targetClass, "Target class must not be null" ); String trimmed = StringUtils.trimAllWhitespace(text); if (Byte.class == targetClass) { return isHexNumber(trimmed) ? Byte.decode(trimmed) : Byte.valueOf(trimmed); } else if (Short.class == targetClass) { return isHexNumber(trimmed) ? Short.decode(trimmed) : Short.valueOf(trimmed); } else if (Integer.class == targetClass) { return isHexNumber(trimmed) ? Integer.decode(trimmed) : Integer.valueOf(trimmed); } else if (Long.class == targetClass) { return isHexNumber(trimmed) ? Long.decode(trimmed) : Long.valueOf(trimmed); } else if (BigInteger.class == targetClass) { return isHexNumber(trimmed) ? decodeBigInteger(trimmed) : new BigInteger (trimmed); } else if (Float.class == targetClass) { return Float.valueOf(trimmed); } else if (Double.class == targetClass) { return Double.valueOf(trimmed); } else if (BigDecimal.class != targetClass && Number.class != targetClass) { throw new IllegalArgumentException ("Cannot convert String [" + text + "] to target class [" + targetClass.getName() + "]" ); } else { return new BigDecimal (trimmed); } } ... }
至此AbstractNestablePropertyAccessor类中的valueToApply = this.convertForProperty(tokens.canonicalName, oldValue, originalValue, ph.toTypeDescriptor())方法执行完成了。
36、请求处理-【源码分析】-自定义Converter原理 未来我们可以给WebDataBinder里面放自己的Converter;
下面演示将字符串“啊猫,3”转换成Pet对象。
1 2 3 4 5 6 7 8 9 10 11 12 13 14 15 16 17 18 19 20 21 22 23 24 25 @Bean public WebMvcConfigurer webMvcConfigurer () { return new WebMvcConfigurer () { @Override public void addFormatters (FormatterRegistry registry) { registry.addConverter(new Converter <String, Pet>() { @Override public Pet convert (String source) { if (!StringUtils.isEmpty(source)){ Pet pet = new Pet (); String[] split = source.split("," ); pet.setName(split[0 ]); pet.setAge(Integer.parseInt(split[1 ])); return pet; } return null ; } }); } }; }
37、响应处理-【源码分析】-ReturnValueHandler原理
假设给前端自动返回json数据,需要引入相关的依赖
1 2 3 4 5 6 7 8 9 10 11 12 <dependency > <groupId > org.springframework.boot</groupId > <artifactId > spring-boot-starter-web</artifactId > </dependency > <dependency > <groupId > org.springframework.boot</groupId > <artifactId > spring-boot-starter-json</artifactId > <version > 2.3.4.RELEASE</version > <scope > compile</scope > </dependency >
控制层代码如下:
1 2 3 4 5 6 7 8 9 10 11 12 13 14 @Controller public class ResponseTestController { @ResponseBody @GetMapping(value = "/test/person") public Person getPerson () { Person person = new Person (); person.setAge(28 ); person.setBirth(new Date ()); person.setUserName("zhangsan" ); return person; } }
32、请求处理-【源码分析】-各种类型参数解析原理 - 返回值处理器 有讨论ReturnValueHandler 。现在直接看看重点:
1 2 3 4 5 6 7 8 9 10 11 12 13 14 15 16 17 18 19 20 21 22 23 24 25 26 27 28 29 30 31 32 33 34 35 36 public class RequestMappingHandlerAdapter extends AbstractHandlerMethodAdapter implements BeanFactoryAware , InitializingBean { ... @Nullable protected ModelAndView invokeHandlerMethod (HttpServletRequest request, HttpServletResponse response, HandlerMethod handlerMethod) throws Exception { ServletWebRequest webRequest = new ServletWebRequest (request, response); try { ... ServletInvocableHandlerMethod invocableMethod = createInvocableHandlerMethod(handlerMethod); if (this .argumentResolvers != null ) { invocableMethod.setHandlerMethodArgumentResolvers(this .argumentResolvers); } if (this .returnValueHandlers != null ) { invocableMethod.setHandlerMethodReturnValueHandlers(this .returnValueHandlers); } ... invocableMethod.invokeAndHandle(webRequest, mavContainer); if (asyncManager.isConcurrentHandlingStarted()) { return null ; } return getModelAndView(mavContainer, modelFactory, webRequest); } finally { webRequest.requestCompleted(); } }
1 2 3 4 5 6 7 8 9 10 11 12 13 14 15 16 17 18 public class ServletInvocableHandlerMethod extends InvocableHandlerMethod { public void invokeAndHandle (ServletWebRequest webRequest, ModelAndViewContainer mavContainer, Object... providedArgs) throws Exception { Object returnValue = invokeForRequest(webRequest, mavContainer, providedArgs); ... try { this .returnValueHandlers.handleReturnValue( returnValue, getReturnValueType(returnValue), mavContainer, webRequest); } catch (Exception ex) { ... } }
1 2 3 4 5 6 7 8 9 10 11 12 13 14 15 16 17 18 19 20 21 22 23 24 25 26 27 28 29 30 31 32 33 34 35 public class HandlerMethodReturnValueHandlerComposite implements HandlerMethodReturnValueHandler { ... @Override public void handleReturnValue (@Nullable Object returnValue, MethodParameter returnType, ModelAndViewContainer mavContainer, NativeWebRequest webRequest) throws Exception { HandlerMethodReturnValueHandler handler = selectHandler(returnValue, returnType); if (handler == null ) { throw new IllegalArgumentException ("Unknown return value type: " + returnType.getParameterType().getName()); } handler.handleReturnValue(returnValue, returnType, mavContainer, webRequest); } @Nullable private HandlerMethodReturnValueHandler selectHandler (@Nullable Object value, MethodParameter returnType) { boolean isAsyncValue = isAsyncReturnValue(value, returnType); for (HandlerMethodReturnValueHandler handler : this .returnValueHandlers) { if (isAsyncValue && !(handler instanceof AsyncHandlerMethodReturnValueHandler)) { continue ; } if (handler.supportsReturnType(returnType)) { return handler; } } return null ; }
如果要处理@ResponseBody 注解的返回值,需要使用RequestResponseBodyMethodProcessor类中的handleReturnValue()处理返回值,由于它实现HandlerMethodReturnValueHandler接口
1 2 3 4 5 6 7 8 9 10 11 12 13 14 15 16 17 18 19 20 21 22 public class RequestResponseBodyMethodProcessor extends AbstractMessageConverterMethodProcessor { ... @Override public void handleReturnValue (@Nullable Object returnValue, MethodParameter returnType, ModelAndViewContainer mavContainer, NativeWebRequest webRequest) throws IOException, HttpMediaTypeNotAcceptableException, HttpMessageNotWritableException { mavContainer.setRequestHandled(true ); ServletServerHttpRequest inputMessage = createInputMessage(webRequest); ServletServerHttpResponse outputMessage = createOutputMessage(webRequest); writeWithMessageConverters(returnValue, returnType, inputMessage, outputMessage); } }
38、响应处理-【源码分析】-HTTPMessageConverter原理 返回值处理器ReturnValueHandler原理:
返回值处理器判断是否支持这种类型返回值 supportsReturnType
返回值处理器调用 handleReturnValue 进行处理
RequestResponseBodyMethodProcessor 可以处理返回值标了@ResponseBody 注解的。
利用 MessageConverters 进行处理 将数据写为json
内容协商(浏览器默认会以请求头的方式告诉服务器他能接受什么样的内容类型)
服务器最终根据自己自身的能力,决定服务器能生产出什么样内容类型的数据,
SpringMVC会挨个遍历所有容器底层的 HttpMessageConverter ,看谁能处理?
得到MappingJackson2HttpMessageConverter可以将对象写为json
利用MappingJackson2HttpMessageConverter将对象转为json再写出去。
1 2 3 4 5 6 7 8 9 10 11 12 13 14 15 16 17 18 19 20 21 22 23 24 25 26 27 28 29 30 31 32 33 34 35 36 37 38 39 40 41 42 43 44 45 46 47 48 49 50 51 52 53 54 55 56 57 58 59 60 61 62 63 64 65 66 67 68 69 70 71 72 73 74 75 76 77 78 79 80 81 82 83 84 85 86 87 88 89 90 91 92 93 94 95 96 97 98 99 100 101 102 103 104 105 106 107 108 109 110 111 112 113 114 115 116 117 118 119 120 121 122 123 124 125 126 127 128 129 130 131 132 133 134 135 136 137 138 139 140 141 142 143 144 145 146 147 148 149 150 151 152 153 154 155 public abstract class AbstractMessageConverterMethodProcessor extends AbstractMessageConverterMethodArgumentResolver implements HandlerMethodReturnValueHandler { ... protected <T> void writeWithMessageConverters (@Nullable T value, MethodParameter returnType, ServletServerHttpRequest inputMessage, ServletServerHttpResponse outputMessage) throws IOException, HttpMediaTypeNotAcceptableException, HttpMessageNotWritableException { Object body; Class<?> valueType; Type targetType; if (value instanceof CharSequence) { body = value.toString(); valueType = String.class; targetType = String.class; } else { body = value; valueType = getReturnValueType(body, returnType); targetType = GenericTypeResolver.resolveType(getGenericType(returnType), returnType.getContainingClass()); } if (this .isResourceType(value, returnType)) { outputMessage.getHeaders().set("Accept-Ranges" , "bytes" ); if (value != null && inputMessage.getHeaders().getFirst("Range" ) != null && outputMessage.getServletResponse().getStatus() == 200 ) { Resource resource = (Resource)value; try { List<HttpRange> httpRanges = inputMessage.getHeaders().getRange(); outputMessage.getServletResponse().setStatus(HttpStatus.PARTIAL_CONTENT.value()); body = HttpRange.toResourceRegions(httpRanges, resource); valueType = body.getClass(); targetType = RESOURCE_REGION_LIST_TYPE; } catch (IllegalArgumentException var17) { outputMessage.getHeaders().set("Content-Range" , "bytes */" + resource.contentLength()); outputMessage.getServletResponse().setStatus(HttpStatus.REQUESTED_RANGE_NOT_SATISFIABLE.value()); } } } ... MediaType selectedMediaType = null ; MediaType contentType = outputMessage.getHeaders().getContentType(); boolean isContentTypePreset = contentType != null && contentType.isConcrete(); if (isContentTypePreset) { if (logger.isDebugEnabled()) { logger.debug("Found 'Content-Type:" + contentType + "' in response" ); } selectedMediaType = contentType; } else { HttpServletRequest request = inputMessage.getServletRequest(); List<MediaType> acceptableTypes = getAcceptableMediaTypes(request); List<MediaType> producibleTypes = getProducibleMediaTypes(request, valueType, targetType); if (body != null && producibleTypes.isEmpty()) { throw new HttpMessageNotWritableException ( "No converter found for return value of type: " + valueType); } List<MediaType> mediaTypesToUse = new ArrayList <>(); for (MediaType requestedType : acceptableTypes) { for (MediaType producibleType : producibleTypes) { if (requestedType.isCompatibleWith(producibleType)) { mediaTypesToUse.add(getMostSpecificMediaType(requestedType, producibleType)); } } } if (mediaTypesToUse.isEmpty()) { if (body != null ) { throw new HttpMediaTypeNotAcceptableException (producibleTypes); } if (logger.isDebugEnabled()) { logger.debug("No match for " + acceptableTypes + ", supported: " + producibleTypes); } return ; } MediaType.sortBySpecificityAndQuality(mediaTypesToUse); for (MediaType mediaType : mediaTypesToUse) { if (mediaType.isConcrete()) { selectedMediaType = mediaType; break ; } else if (mediaType.isPresentIn(ALL_APPLICATION_MEDIA_TYPES)) { selectedMediaType = MediaType.APPLICATION_OCTET_STREAM; break ; } } if (logger.isDebugEnabled()) { logger.debug("Using '" + selectedMediaType + "', given " + acceptableTypes + " and supported " + producibleTypes); } } if (selectedMediaType != null ) { selectedMediaType = selectedMediaType.removeQualityValue(); for (HttpMessageConverter<?> converter : this .messageConverters) { GenericHttpMessageConverter genericConverter = (converter instanceof GenericHttpMessageConverter ? (GenericHttpMessageConverter<?>) converter : null ); if (genericConverter != null ? ((GenericHttpMessageConverter) converter).canWrite(targetType, valueType, selectedMediaType) : converter.canWrite(valueType, selectedMediaType)) { body = getAdvice().beforeBodyWrite(body, returnType, selectedMediaType, (Class<? extends HttpMessageConverter <?>>) converter.getClass(), inputMessage, outputMessage); if (body != null ) { Object theBody = body; LogFormatUtils.traceDebug(logger, traceOn -> "Writing [" + LogFormatUtils.formatValue(theBody, !traceOn) + "]" ); addContentDispositionHeader(inputMessage, outputMessage); if (genericConverter != null ) { genericConverter.write(body, targetType, selectedMediaType, outputMessage); } else { ((HttpMessageConverter) converter).write(body, selectedMediaType, outputMessage); } } else { if (logger.isDebugEnabled()) { logger.debug("Nothing to write: null body" ); } } return ; } } } ... }
我们研究一下 [[List producibleTypes = getProducibleMediaTypes(request, valueType, targetType)这个方法:]]
1 2 3 4 5 6 7 8 9 10 11 12 13 14 15 16 17 18 19 20 21 22 23 24 25 26 27 28 29 30 31 32 33 34 35 36 37 protected List<MediaType> getProducibleMediaTypes (HttpServletRequest request, Class<?> valueClass, @Nullable Type targetType) { Set<MediaType> mediaTypes = (Set)request.getAttribute(HandlerMapping.PRODUCIBLE_MEDIA_TYPES_ATTRIBUTE); if (!CollectionUtils.isEmpty(mediaTypes)) { return new ArrayList (mediaTypes); } else { Set<MediaType> result = new LinkedHashSet (); Iterator var6 = this .messageConverters.iterator(); while (true ) { while (var6.hasNext()) { HttpMessageConverter<?> converter = (HttpMessageConverter)var6.next(); if (converter instanceof GenericHttpMessageConverter) { GenericHttpMessageConverter<?> ghmc = (GenericHttpMessageConverter)converter; if (targetType != null ) { if (ghmc.canWrite(targetType, valueClass, (MediaType)null )) { result.addAll(converter.getSupportedMediaTypes(valueClass)); } continue ; } } if (converter.canWrite(valueClass, (MediaType)null )) { result.addAll(converter.getSupportedMediaTypes(valueClass)); } } return (List)(result.isEmpty() ? Collections.singletonList(MediaType.ALL) : new ArrayList (result)); } } }
以下为上述的8种HttpMessageConverter 每种转换器支持的返回值的类型不同
我们在研究一下genericConverter.write(body, targetType, selectedMediaType, outputMessage)这个方法
1 2 3 4 5 6 7 8 9 10 11 12 13 14 15 16 17 18 19 20 21 22 23 24 25 public final void write (final T t, @Nullable final Type type, @Nullable MediaType contentType, HttpOutputMessage outputMessage) throws IOException, HttpMessageNotWritableException { HttpHeaders headers = outputMessage.getHeaders(); this .addDefaultHeaders(headers, t, contentType); if (outputMessage instanceof StreamingHttpOutputMessage streamingOutputMessage) { streamingOutputMessage.setBody((outputStream) -> { this .writeInternal(t, type, new HttpOutputMessage () { public OutputStream getBody () { return outputStream; } public HttpHeaders getHeaders () { return headers; } }); }); } else { this .writeInternal(t, type, outputMessage); outputMessage.getBody().flush(); } }
1 2 3 4 5 6 7 8 9 10 11 12 13 14 15 16 17 18 19 20 21 22 23 24 25 26 27 28 29 30 31 32 33 34 35 36 37 38 39 40 41 42 43 44 45 46 47 48 49 50 51 52 53 54 55 56 57 58 59 60 61 62 63 64 65 66 67 68 69 70 71 72 73 74 75 76 77 78 79 80 81 82 83 84 85 86 protected void writeInternal (Object object, @Nullable Type type, HttpOutputMessage outputMessage) throws IOException, HttpMessageNotWritableException { MediaType contentType = outputMessage.getHeaders().getContentType(); JsonEncoding encoding = this .getJsonEncoding(contentType); Class var10000; if (object instanceof MappingJacksonValue mappingJacksonValue) { var10000 = mappingJacksonValue.getValue().getClass(); } else { var10000 = object.getClass(); } Class<?> clazz = var10000; ObjectMapper objectMapper = this .selectObjectMapper(clazz, contentType); Assert.state(objectMapper != null , () -> { return "No ObjectMapper for " + clazz.getName(); }); OutputStream outputStream = StreamUtils.nonClosing(outputMessage.getBody()); try { JsonGenerator generator = objectMapper.getFactory().createGenerator(outputStream, encoding); try { this .writePrefix(generator, object); Object value = object; Class<?> serializationView = null ; FilterProvider filters = null ; JavaType javaType = null ; if (object instanceof MappingJacksonValue mappingJacksonValue) { value = mappingJacksonValue.getValue(); serializationView = mappingJacksonValue.getSerializationView(); filters = mappingJacksonValue.getFilters(); } if (type != null && TypeUtils.isAssignable(type, value.getClass())) { javaType = this .getJavaType(type, (Class)null ); } ObjectWriter objectWriter = serializationView != null ? objectMapper.writerWithView(serializationView) : objectMapper.writer(); if (filters != null ) { objectWriter = objectWriter.with(filters); } if (javaType != null && (javaType.isContainerType() || javaType.isTypeOrSubTypeOf(Optional.class))) { objectWriter = objectWriter.forType(javaType); } SerializationConfig config = objectWriter.getConfig(); if (contentType != null && contentType.isCompatibleWith(MediaType.TEXT_EVENT_STREAM) && config.isEnabled(SerializationFeature.INDENT_OUTPUT)) { objectWriter = objectWriter.with(this .ssePrettyPrinter); } objectWriter = this .customizeWriter(objectWriter, javaType, contentType); objectWriter.writeValue(generator, value); this .writeSuffix(generator, object); generator.flush(); } catch (Throwable var17) { if (generator != null ) { try { generator.close(); } catch (Throwable var16) { var17.addSuppressed(var16); } } throw var17; } if (generator != null ) { generator.close(); } } catch (InvalidDefinitionException var18) { throw new HttpMessageConversionException ("Type definition error: " + var18.getType(), var18); } catch (JsonProcessingException var19) { throw new HttpMessageNotWritableException ("Could not write JSON: " + var19.getOriginalMessage(), var19); } }
HTTPMessageConverter接口:
1 2 3 4 5 6 7 8 9 10 11 12 13 14 15 16 17 18 19 20 21 22 23 24 25 26 27 28 29 30 31 32 33 34 public interface HttpMessageConverter <T> { boolean canRead (Class<?> clazz, @Nullable MediaType mediaType) ; boolean canWrite (Class<?> clazz, @Nullable MediaType mediaType) ; List<MediaType> getSupportedMediaTypes () ; T read (Class<? extends T> clazz, HttpInputMessage inputMessage) throws IOException, HttpMessageNotReadableException; void write (T t, @Nullable MediaType contentType, HttpOutputMessage outputMessage) throws IOException, HttpMessageNotWritableException; }
HttpMessageConverter: 看是否支持将 此 Class类型的对象,转为MediaType类型的数据。
例子:Person对象转为JSON,或者 JSON转为Person,这将用到MappingJackson2HttpMessageConverter
1 2 3 public class MappingJackson2HttpMessageConverter extends AbstractJackson2HttpMessageConverter { ... }
关于MappingJackson2HttpMessageConverter的实例化请看下节。
关于HttpMessageConverters的初始化 DispatcherServlet的初始化时会调用initHandlerAdapters(ApplicationContext context)
1 2 3 4 5 6 7 8 9 10 11 12 13 14 15 16 17 18 public class DispatcherServlet extends FrameworkServlet { ... private void initHandlerAdapters (ApplicationContext context) { this .handlerAdapters = null ; if (this .detectAllHandlerAdapters) { Map<String, HandlerAdapter> matchingBeans = BeanFactoryUtils.beansOfTypeIncludingAncestors(context, HandlerAdapter.class, true , false ); if (!matchingBeans.isEmpty()) { this .handlerAdapters = new ArrayList <>(matchingBeans.values()); AnnotationAwareOrderComparator.sort(this .handlerAdapters); } } ...
上述代码会加载ApplicationContext的所有HandlerAdapter,用来处理@RequestMapping的RequestMappingHandlerAdapter实现HandlerAdapter接口,RequestMappingHandlerAdapter也被实例化。
1 2 3 4 5 6 7 8 9 10 11 12 13 14 15 16 17 18 19 20 21 22 23 public class RequestMappingHandlerAdapter extends AbstractHandlerMethodAdapter implements BeanFactoryAware , InitializingBean { ... private List<HttpMessageConverter<?>> messageConverters; ... public RequestMappingHandlerAdapter () { this .messageConverters = new ArrayList <>(4 ); this .messageConverters.add(new ByteArrayHttpMessageConverter ()); this .messageConverters.add(new StringHttpMessageConverter ()); if (!shouldIgnoreXml) { try { this .messageConverters.add(new SourceHttpMessageConverter <>()); } catch (Error err) { } } this .messageConverters.add(new AllEncompassingFormHttpMessageConverter ()); }
在构造器中看到一堆 HttpMessageConverter。接着,重点查看AllEncompassingFormHttpMessageConverter类:
1 2 3 4 5 6 7 8 9 10 11 12 13 14 15 16 17 18 19 20 21 22 23 24 25 26 27 28 29 30 31 32 33 34 35 36 37 38 39 40 41 42 43 44 45 46 47 48 49 50 51 52 53 54 55 56 57 58 59 60 61 62 63 64 65 66 67 68 69 70 71 72 73 74 75 76 77 78 79 80 81 82 83 84 85 86 87 88 89 90 public class AllEncompassingFormHttpMessageConverter extends FormHttpMessageConverter { private static final boolean shouldIgnoreXml = SpringProperties.getFlag("spring.xml.ignore" ); private static final boolean jaxb2Present; private static final boolean jackson2Present; private static final boolean jackson2XmlPresent; private static final boolean jackson2SmilePresent; private static final boolean gsonPresent; private static final boolean jsonbPresent; private static final boolean kotlinSerializationJsonPresent; static { ClassLoader classLoader = AllEncompassingFormHttpMessageConverter.class.getClassLoader(); jaxb2Present = ClassUtils.isPresent("javax.xml.bind.Binder" , classLoader); jackson2Present = ClassUtils.isPresent("com.fasterxml.jackson.databind.ObjectMapper" , classLoader) && ClassUtils.isPresent("com.fasterxml.jackson.core.JsonGenerator" , classLoader); jackson2XmlPresent = ClassUtils.isPresent("com.fasterxml.jackson.dataformat.xml.XmlMapper" , classLoader); jackson2SmilePresent = ClassUtils.isPresent("com.fasterxml.jackson.dataformat.smile.SmileFactory" , classLoader); gsonPresent = ClassUtils.isPresent("com.google.gson.Gson" , classLoader); jsonbPresent = ClassUtils.isPresent("javax.json.bind.Jsonb" , classLoader); kotlinSerializationJsonPresent = ClassUtils.isPresent("kotlinx.serialization.json.Json" , classLoader); } public AllEncompassingFormHttpMessageConverter () { if (!shouldIgnoreXml) { try { addPartConverter(new SourceHttpMessageConverter <>()); } catch (Error err) { } if (jaxb2Present && !jackson2XmlPresent) { addPartConverter(new Jaxb2RootElementHttpMessageConverter ()); } } if (jackson2Present) { addPartConverter(new MappingJackson2HttpMessageConverter ()); } else if (gsonPresent) { addPartConverter(new GsonHttpMessageConverter ()); } else if (jsonbPresent) { addPartConverter(new JsonbHttpMessageConverter ()); } else if (kotlinSerializationJsonPresent) { addPartConverter(new KotlinSerializationJsonHttpMessageConverter ()); } if (jackson2XmlPresent && !shouldIgnoreXml) { addPartConverter(new MappingJackson2XmlHttpMessageConverter ()); } if (jackson2SmilePresent) { addPartConverter(new MappingJackson2SmileHttpMessageConverter ()); } } } public class FormHttpMessageConverter implements HttpMessageConverter <MultiValueMap<String, ?>> { ... private List<HttpMessageConverter<?>> partConverters = new ArrayList <>(); ... public void addPartConverter (HttpMessageConverter<?> partConverter) { Assert.notNull(partConverter, "'partConverter' must not be null" ); this .partConverters.add(partConverter); } ... }
在AllEncompassingFormHttpMessageConverter类构造器看到MappingJackson2HttpMessageConverter类的实例化,AllEncompassingFormHttpMessageConverter包含 MappingJackson2HttpMessageConverter。
ReturnValueHandler是怎么与MappingJackson2HttpMessageConverter关联起来?请看下节。
ReturnValueHandler与MappingJackson2HttpMessageConverter关联 再次回顾RequestMappingHandlerAdapter
1 2 3 4 5 6 7 8 9 10 11 12 13 14 15 16 17 18 19 20 21 22 23 24 25 26 27 28 29 30 31 32 33 34 35 36 37 38 39 40 41 42 43 44 45 46 47 48 49 50 51 52 53 54 55 56 57 58 59 60 61 62 63 64 65 66 67 68 69 70 71 72 73 74 75 76 77 78 79 80 81 82 83 84 85 86 87 88 89 90 91 92 93 94 95 96 97 98 99 100 101 102 103 104 105 106 107 public class RequestMappingHandlerAdapter extends AbstractHandlerMethodAdapter implements BeanFactoryAware , InitializingBean { ... @Nullable private HandlerMethodReturnValueHandlerComposite returnValueHandlers; @Override @Nullable public final ModelAndView handle (HttpServletRequest request, HttpServletResponse response, Object handler) throws Exception { return handleInternal(request, response, (HandlerMethod) handler); } @Override protected ModelAndView handleInternal (HttpServletRequest request, HttpServletResponse response, HandlerMethod handlerMethod) throws Exception { ModelAndView mav; ... mav = invokeHandlerMethod(request, response, handlerMethod); ... return mav; } @Nullable protected ModelAndView invokeHandlerMethod (HttpServletRequest request, HttpServletResponse response, HandlerMethod handlerMethod) throws Exception { ServletWebRequest webRequest = new ServletWebRequest (request, response); try { WebDataBinderFactory binderFactory = getDataBinderFactory(handlerMethod); ModelFactory modelFactory = getModelFactory(handlerMethod, binderFactory); ServletInvocableHandlerMethod invocableMethod = createInvocableHandlerMethod(handlerMethod); if (this .argumentResolvers != null ) { invocableMethod.setHandlerMethodArgumentResolvers(this .argumentResolvers); } if (this .returnValueHandlers != null ) { invocableMethod.setHandlerMethodReturnValueHandlers(this .returnValueHandlers); } ... invocableMethod.invokeAndHandle(webRequest, mavContainer); if (asyncManager.isConcurrentHandlingStarted()) { return null ; } return getModelAndView(mavContainer, modelFactory, webRequest); } finally { webRequest.requestCompleted(); } } @Override public void afterPropertiesSet () { ... if (this .returnValueHandlers == null ) { List<HandlerMethodReturnValueHandler> handlers = getDefaultReturnValueHandlers(); this .returnValueHandlers = new HandlerMethodReturnValueHandlerComposite ().addHandlers(handlers); } } private List<HandlerMethodReturnValueHandler> getDefaultReturnValueHandlers () { List<HandlerMethodReturnValueHandler> handlers = new ArrayList <>(20 ); ... handlers.add(new RequestResponseBodyMethodProcessor (getMessageConverters(), this .contentNegotiationManager, this .requestResponseBodyAdvice)); ... return handlers; } public List<HttpMessageConverter<?>> getMessageConverters() { return this .messageConverters; } public RequestMappingHandlerAdapter () { this .messageConverters = new ArrayList <>(4 ); this .messageConverters.add(new ByteArrayHttpMessageConverter ()); this .messageConverters.add(new StringHttpMessageConverter ()); if (!shouldIgnoreXml) { try { this .messageConverters.add(new SourceHttpMessageConverter <>()); } catch (Error err) { } } this .messageConverters.add(new AllEncompassingFormHttpMessageConverter ()); } ... }
应用中WebMvcAutoConfiguration(底层是WebMvcConfigurationSupport实现)传入更多messageConverters,其中就包含MappingJackson2HttpMessageConverter。
39、响应处理-【源码分析】-内容协商原理 根据客户端接收能力不同,返回不同媒体类型的数据。
引入XML依赖:
1 2 3 4 <dependency > <groupId > com.fasterxml.jackson.dataformat</groupId > <artifactId > jackson-dataformat-xml</artifactId > </dependency >
可用Postman软件分别测试返回json和xml:只需要改变请求头中Accept字段(application/json、application/xml)。
Http协议中规定的,Accept字段告诉服务器本客户端可以接收的数据类型。
内容协商原理 :
判断当前响应头中是否已经有确定的媒体类型MediaType。
获取客户端(PostMan、浏览器)支持接收的内容类型。(获取客户端Accept请求头字段application/xml)(这一步在下一节有详细介绍)
contentNegotiationManager 内容协商管理器 默认使用基于请求头的策略HeaderContentNegotiationStrategy 确定客户端可以接收的内容类型
遍历循环所有当前系统的 MessageConverter,看谁支持操作这个对象(Person)
找到支持操作Person的converter,把converter支持的媒体类型统计出来。
客户端需要application/xml,服务端有10种MediaType。
进行内容协商的最佳匹配媒体类型
用 支持 将对象转为 最佳匹配媒体类型 的converter。调用它进行转化 。
1 2 3 4 5 6 7 8 9 10 11 12 13 14 15 16 17 18 19 20 21 22 23 24 25 26 27 28 29 30 31 32 33 34 35 36 37 38 39 40 41 42 43 44 45 46 47 48 49 50 51 52 53 54 55 56 57 58 59 60 61 62 63 64 65 66 67 68 69 70 71 72 73 74 75 76 77 78 79 80 81 82 83 84 85 86 87 88 89 90 91 92 93 94 95 96 97 98 99 100 101 102 103 104 105 106 107 108 109 110 111 112 113 114 115 116 117 118 119 120 121 122 123 124 125 126 127 128 129 130 131 132 public abstract class AbstractMessageConverterMethodProcessor extends AbstractMessageConverterMethodArgumentResolver implements HandlerMethodReturnValueHandler { ... protected <T> void writeWithMessageConverters (@Nullable T value, MethodParameter returnType, ServletServerHttpRequest inputMessage, ServletServerHttpResponse outputMessage) throws IOException, HttpMediaTypeNotAcceptableException, HttpMessageNotWritableException { Object body; Class<?> valueType; Type targetType; if (value instanceof CharSequence) { body = value.toString(); valueType = String.class; targetType = String.class; } else { body = value; valueType = getReturnValueType(body, returnType); targetType = GenericTypeResolver.resolveType(getGenericType(returnType), returnType.getContainingClass()); } ... MediaType selectedMediaType = null ; MediaType contentType = outputMessage.getHeaders().getContentType(); boolean isContentTypePreset = contentType != null && contentType.isConcrete(); if (isContentTypePreset) { if (logger.isDebugEnabled()) { logger.debug("Found 'Content-Type:" + contentType + "' in response" ); } selectedMediaType = contentType; } else { HttpServletRequest request = inputMessage.getServletRequest(); List<MediaType> acceptableTypes = getAcceptableMediaTypes(request); List<MediaType> producibleTypes = getProducibleMediaTypes(request, valueType, targetType); if (body != null && producibleTypes.isEmpty()) { throw new HttpMessageNotWritableException ( "No converter found for return value of type: " + valueType); } List<MediaType> mediaTypesToUse = new ArrayList <>(); for (MediaType requestedType : acceptableTypes) { for (MediaType producibleType : producibleTypes) { if (requestedType.isCompatibleWith(producibleType)) { mediaTypesToUse.add(getMostSpecificMediaType(requestedType, producibleType)); } } } if (mediaTypesToUse.isEmpty()) { if (body != null ) { throw new HttpMediaTypeNotAcceptableException (producibleTypes); } if (logger.isDebugEnabled()) { logger.debug("No match for " + acceptableTypes + ", supported: " + producibleTypes); } return ; } MediaType.sortBySpecificityAndQuality(mediaTypesToUse); for (MediaType mediaType : mediaTypesToUse) { if (mediaType.isConcrete()) { selectedMediaType = mediaType; break ; } else if (mediaType.isPresentIn(ALL_APPLICATION_MEDIA_TYPES)) { selectedMediaType = MediaType.APPLICATION_OCTET_STREAM; break ; } } if (logger.isDebugEnabled()) { logger.debug("Using '" + selectedMediaType + "', given " + acceptableTypes + " and supported " + producibleTypes); } } if (selectedMediaType != null ) { selectedMediaType = selectedMediaType.removeQualityValue(); for (HttpMessageConverter<?> converter : this .messageConverters) { GenericHttpMessageConverter genericConverter = (converter instanceof GenericHttpMessageConverter ? (GenericHttpMessageConverter<?>) converter : null ); if (genericConverter != null ? ((GenericHttpMessageConverter) converter).canWrite(targetType, valueType, selectedMediaType) : converter.canWrite(valueType, selectedMediaType)) { body = getAdvice().beforeBodyWrite(body, returnType, selectedMediaType, (Class<? extends HttpMessageConverter <?>>) converter.getClass(), inputMessage, outputMessage); if (body != null ) { Object theBody = body; LogFormatUtils.traceDebug(logger, traceOn -> "Writing [" + LogFormatUtils.formatValue(theBody, !traceOn) + "]" ); addContentDispositionHeader(inputMessage, outputMessage); if (genericConverter != null ) { genericConverter.write(body, targetType, selectedMediaType, outputMessage); } else { ((HttpMessageConverter) converter).write(body, selectedMediaType, outputMessage); } } else { if (logger.isDebugEnabled()) { logger.debug("Nothing to write: null body" ); } } return ; } } } ... }
40、响应处理-【源码分析】-基于请求参数的内容协商原理 上一节内容协商原理的第二步:
获取客户端(PostMan、浏览器)支持接收的内容类型。(获取客户端Accept请求头字段application/xml)
contentNegotiationManager 内容协商管理器 默认使用基于请求头的策略HeaderContentNegotiationStrategy 确定客户端可以接收的内容类型
1 2 3 4 5 6 7 8 9 10 11 12 13 14 15 16 17 18 19 20 21 22 23 24 25 26 27 28 29 30 31 32 33 34 35 36 37 38 39 40 41 42 43 44 45 46 public abstract class AbstractMessageConverterMethodProcessor extends AbstractMessageConverterMethodArgumentResolver implements HandlerMethodReturnValueHandler { ... protected <T> void writeWithMessageConverters (@Nullable T value, MethodParameter returnType, ServletServerHttpRequest inputMessage, ServletServerHttpResponse outputMessage) throws IOException, HttpMediaTypeNotAcceptableException, HttpMessageNotWritableException { Object body; Class<?> valueType; Type targetType; ... MediaType selectedMediaType = null ; MediaType contentType = outputMessage.getHeaders().getContentType(); boolean isContentTypePreset = contentType != null && contentType.isConcrete(); if (isContentTypePreset) { if (logger.isDebugEnabled()) { logger.debug("Found 'Content-Type:" + contentType + "' in response" ); } selectedMediaType = contentType; } else { HttpServletRequest request = inputMessage.getServletRequest(); List<MediaType> acceptableTypes = getAcceptableMediaTypes(request); List<MediaType> producibleTypes = getProducibleMediaTypes(request, valueType, targetType); ... } private List<MediaType> getAcceptableMediaTypes (HttpServletRequest request) throws HttpMediaTypeNotAcceptableException { return this .contentNegotiationManager.resolveMediaTypes(new ServletWebRequest (request)); } }
1 2 3 4 5 6 7 8 9 10 11 12 13 14 15 16 17 18 19 20 21 22 23 24 public class ContentNegotiationManager implements ContentNegotiationStrategy , MediaTypeFileExtensionResolver { ... public ContentNegotiationManager () { this (new HeaderContentNegotiationStrategy ()); } @Override public List<MediaType> resolveMediaTypes (NativeWebRequest request) throws HttpMediaTypeNotAcceptableException { for (ContentNegotiationStrategy strategy : this .strategies) { List<MediaType> mediaTypes = strategy.resolveMediaTypes(request); if (mediaTypes.equals(MEDIA_TYPE_ALL_LIST)) { continue ; } return mediaTypes; } return MEDIA_TYPE_ALL_LIST; } ... }
1 2 3 4 5 6 7 8 9 10 11 12 13 14 15 16 17 18 19 20 21 22 23 24 25 26 27 28 29 30 31 public class HeaderContentNegotiationStrategy implements ContentNegotiationStrategy { @Override public List<MediaType> resolveMediaTypes (NativeWebRequest request) throws HttpMediaTypeNotAcceptableException { String[] headerValueArray = request.getHeaderValues(HttpHeaders.ACCEPT); if (headerValueArray == null ) { return MEDIA_TYPE_ALL_LIST; } List<String> headerValues = Arrays.asList(headerValueArray); try { List<MediaType> mediaTypes = MediaType.parseMediaTypes(headerValues); MediaType.sortBySpecificityAndQuality(mediaTypes); return !CollectionUtils.isEmpty(mediaTypes) ? mediaTypes : MEDIA_TYPE_ALL_LIST; } catch (InvalidMediaTypeException ex) { throw new HttpMediaTypeNotAcceptableException ( "Could not parse 'Accept' header " + headerValues + ": " + ex.getMessage()); } } }
开启浏览器参数方式内容协商功能 为了方便内容协商,开启基于请求参数的内容协商功能。
1 2 3 4 spring: mvc: contentnegotiation: favor-parameter: true
开启之后就可以在请求的时候使用format=想要响应的数据类型:如http://localhost:8080/test/person?format=json来得到json数据的响应
内容协商管理器,就会多了一个ParameterContentNegotiationStrategy(由Spring容器注入)
1 2 3 4 5 6 7 8 9 10 11 12 13 14 15 16 17 18 19 20 21 22 23 24 25 26 27 28 29 30 31 32 33 34 35 36 37 38 39 40 41 42 43 44 45 46 47 48 49 50 51 52 53 54 55 56 57 58 59 60 61 62 63 64 65 66 67 68 69 70 71 72 73 74 75 76 77 78 79 80 81 82 83 84 85 86 87 88 89 90 91 public class ParameterContentNegotiationStrategy extends AbstractMappingContentNegotiationStrategy { private String parameterName = "format" ; public ParameterContentNegotiationStrategy (Map<String, MediaType> mediaTypes) { super (mediaTypes); } public void setParameterName (String parameterName) { Assert.notNull(parameterName, "'parameterName' is required" ); this .parameterName = parameterName; } public String getParameterName () { return this .parameterName; } @Override @Nullable protected String getMediaTypeKey (NativeWebRequest request) { return request.getParameter(getParameterName()); } @Override public List<MediaType> resolveMediaTypes (NativeWebRequest webRequest) throws HttpMediaTypeNotAcceptableException { return resolveMediaTypeKey(webRequest, getMediaTypeKey(webRequest)); } public List<MediaType> resolveMediaTypeKey (NativeWebRequest webRequest, @Nullable String key) throws HttpMediaTypeNotAcceptableException { if (StringUtils.hasText(key)) { MediaType mediaType = lookupMediaType(key); if (mediaType != null ) { handleMatch(key, mediaType); return Collections.singletonList(mediaType); } mediaType = handleNoMatch(webRequest, key); if (mediaType != null ) { addMapping(key, mediaType); return Collections.singletonList(mediaType); } } return MEDIA_TYPE_ALL_LIST; } } @Override public List<MediaType> resolveMediaTypes (NativeWebRequest request) throws HttpMediaTypeNotAcceptableException { for (ContentNegotiationStrategy strategy : this .strategies) { List<MediaType> mediaTypes = strategy.resolveMediaTypes(request); if (mediaTypes.equals(MEDIA_TYPE_ALL_LIST)) { continue ; } return mediaTypes; } return MEDIA_TYPE_ALL_LIST; }
然后,浏览器地址输入带format参数的URL:
1 2 3 http://localhost:8080/test/person?format=json 或 http://localhost:8080/test/person?format=xml
这样,后端会根据参数format的值,返回对应json或xml格式的数据。
这里我们思考一个问题,springboot是怎么帮我们添加所有messageConverters的呢?
1 2 3 4 5 6 7 8 9 10 11 12 13 14 15 16 17 18 19 20 21 22 23 24 25 26 27 28 29 30 31 32 33 34 35 36 37 38 39 40 41 42 43 44 45 46 47 48 49 50 51 52 53 @AutoConfiguration( after = {DispatcherServletAutoConfiguration.class, TaskExecutionAutoConfiguration.class, ValidationAutoConfiguration.class} ) @ConditionalOnWebApplication( type = Type.SERVLET ) @ConditionalOnClass({Servlet.class, DispatcherServlet.class, WebMvcConfigurer.class}) @ConditionalOnMissingBean({WebMvcConfigurationSupport.class}) @AutoConfigureOrder(-2147483638) @ImportRuntimeHints({WebResourcesRuntimeHints.class}) public class WebMvcAutoConfiguration { ... @Configuration( proxyBeanMethods = false ) @Import({EnableWebMvcConfiguration.class}) @EnableConfigurationProperties({WebMvcProperties.class, WebProperties.class}) @Order(0) public static class WebMvcAutoConfigurationAdapter implements WebMvcConfigurer , ServletContextAware { private static final Log logger = LogFactory.getLog(WebMvcConfigurer.class); private final WebProperties.Resources resourceProperties; private final WebMvcProperties mvcProperties; private final ListableBeanFactory beanFactory; private final ObjectProvider<HttpMessageConverters> messageConvertersProvider; private final ObjectProvider<DispatcherServletPath> dispatcherServletPath; private final ObjectProvider<ServletRegistrationBean<?>> servletRegistrations; private final ResourceHandlerRegistrationCustomizer resourceHandlerRegistrationCustomizer; private ServletContext servletContext; public WebMvcAutoConfigurationAdapter (WebProperties webProperties, WebMvcProperties mvcProperties, ListableBeanFactory beanFactory, ObjectProvider<HttpMessageConverters> messageConvertersProvider, ObjectProvider<ResourceHandlerRegistrationCustomizer> resourceHandlerRegistrationCustomizerProvider, ObjectProvider<DispatcherServletPath> dispatcherServletPath, ObjectProvider<ServletRegistrationBean<?>> servletRegistrations) { this .resourceProperties = webProperties.getResources(); this .mvcProperties = mvcProperties; this .beanFactory = beanFactory; this .messageConvertersProvider = messageConvertersProvider; this .resourceHandlerRegistrationCustomizer = (ResourceHandlerRegistrationCustomizer)resourceHandlerRegistrationCustomizerProvider.getIfAvailable(); this .dispatcherServletPath = dispatcherServletPath; this .servletRegistrations = servletRegistrations; } public void setServletContext (ServletContext servletContext) { this .servletContext = servletContext; } public void configureMessageConverters (List<HttpMessageConverter<?>> converters) { this .messageConvertersProvider.ifAvailable((customConverters) -> { converters.addAll(customConverters.getConverters()); }); } }
第一步:执行customConverters.getConverters()方法,获取里面的converters
1 2 3 4 public List<HttpMessageConverter<?>> getConverters() { return this .converters; }
第二步:
1 2 3 4 5 6 7 8 9 10 11 12 13 14 15 16 17 18 19 20 21 22 23 24 25 26 27 28 29 30 31 32 33 34 35 36 37 38 39 40 41 42 43 44 45 46 47 48 49 50 51 52 53 54 55 56 57 58 59 60 61 62 63 64 65 66 67 68 69 70 71 72 73 74 75 76 77 78 79 80 81 82 83 84 85 86 87 88 89 90 91 92 93 94 95 96 97 98 99 100 101 102 103 104 105 106 107 108 109 110 111 112 113 114 115 116 117 public class HttpMessageConverters implements Iterable <HttpMessageConverter<?>> { private static final List<Class<?>> NON_REPLACING_CONVERTERS; private static final Map<Class<?>, Class<?>> EQUIVALENT_CONVERTERS; private final List<HttpMessageConverter<?>> converters; public HttpMessageConverters (HttpMessageConverter<?>... additionalConverters) { this ((Collection)Arrays.asList(additionalConverters)); } public HttpMessageConverters (Collection<HttpMessageConverter<?>> additionalConverters) { this (true , additionalConverters); } public HttpMessageConverters (boolean addDefaultConverters, Collection<HttpMessageConverter<?>> converters) { List<HttpMessageConverter<?>> combined = this .getCombinedConverters(converters, addDefaultConverters ? this .getDefaultConverters() : Collections.emptyList()); combined = this .postProcessConverters(combined); this .converters = Collections.unmodifiableList(combined); } private List<HttpMessageConverter<?>> getDefaultConverters() { List<HttpMessageConverter<?>> converters = new ArrayList (); if (ClassUtils.isPresent("org.springframework.web.servlet.config.annotation.WebMvcConfigurationSupport" , (ClassLoader)null )) { converters.addAll((new WebMvcConfigurationSupport () { public List<HttpMessageConverter<?>> defaultMessageConverters() { return super .getMessageConverters(); } }).defaultMessageConverters()); } else { converters.addAll((new RestTemplate ()).getMessageConverters()); } this .reorderXmlConvertersToEnd(converters); return converters; } ... protected final void addDefaultHttpMessageConverters (List<HttpMessageConverter<?>> messageConverters) { messageConverters.add(new ByteArrayHttpMessageConverter ()); messageConverters.add(new StringHttpMessageConverter ()); messageConverters.add(new ResourceHttpMessageConverter ()); messageConverters.add(new ResourceRegionHttpMessageConverter ()); messageConverters.add(new AllEncompassingFormHttpMessageConverter ()); if (romePresent) { messageConverters.add(new AtomFeedHttpMessageConverter ()); messageConverters.add(new RssChannelHttpMessageConverter ()); } Jackson2ObjectMapperBuilder builder; if (jackson2XmlPresent) { builder = Jackson2ObjectMapperBuilder.xml(); if (this .applicationContext != null ) { builder.applicationContext(this .applicationContext); } messageConverters.add(new MappingJackson2XmlHttpMessageConverter (builder.build())); } else if (jaxb2Present) { messageConverters.add(new Jaxb2RootElementHttpMessageConverter ()); } if (kotlinSerializationCborPresent) { messageConverters.add(new KotlinSerializationCborHttpMessageConverter ()); } if (kotlinSerializationJsonPresent) { messageConverters.add(new KotlinSerializationJsonHttpMessageConverter ()); } if (kotlinSerializationProtobufPresent) { messageConverters.add(new KotlinSerializationProtobufHttpMessageConverter ()); } if (jackson2Present) { builder = Jackson2ObjectMapperBuilder.json(); if (this .applicationContext != null ) { builder.applicationContext(this .applicationContext); } messageConverters.add(new MappingJackson2HttpMessageConverter (builder.build())); } else if (gsonPresent) { messageConverters.add(new GsonHttpMessageConverter ()); } else if (jsonbPresent) { messageConverters.add(new JsonbHttpMessageConverter ()); } if (jackson2SmilePresent) { builder = Jackson2ObjectMapperBuilder.smile(); if (this .applicationContext != null ) { builder.applicationContext(this .applicationContext); } messageConverters.add(new MappingJackson2SmileHttpMessageConverter (builder.build())); } if (jackson2CborPresent) { builder = Jackson2ObjectMapperBuilder.cbor(); if (this .applicationContext != null ) { builder.applicationContext(this .applicationContext); } messageConverters.add(new MappingJackson2CborHttpMessageConverter (builder.build())); } } ... }
41、响应处理-【源码分析】-自定义MessageConverter 实现多协议数据兼容。json、xml、x-guigu (这个是自创的)
@ResponseBody 响应数据出去 调用 RequestResponseBodyMethodProcessor 处理
Processor 处理方法返回值。通过 MessageConverter处理
所有 MessageConverter 合起来可以支持各种媒体类型数据的操作(读、写)
内容协商找到最终的 messageConverter
想要给SpringMVC的配置一些其他功能,一个入口给容器中添加一个 WebMvcConfigurerWebMvcConfigurer里重写很多功能
1 2 3 4 5 6 7 8 9 10 11 12 13 @Configuration(proxyBeanMethods = false) public class WebConfig { @Bean public WebMvcConfigurer webMvcConfigurer () { return new WebMvcConfigurer () { @Override public void extendMessageConverters (List<HttpMessageConverter<?>> converters) { converters.add(new GuiguMessageConverter ()); } } } }
1 2 3 4 5 6 7 8 9 10 11 12 13 14 15 16 17 18 19 20 21 22 23 24 25 26 27 28 29 30 31 32 33 34 35 36 37 38 39 40 41 42 43 public class GuiguMessageConverter implements HttpMessageConverter <Person> { @Override public boolean canRead (Class<?> clazz, MediaType mediaType) { return false ; } @Override public boolean canWrite (Class<?> clazz, MediaType mediaType) { return clazz.isAssignableFrom(Person.class); } @Override public List<MediaType> getSupportedMediaTypes () { return MediaType.parseMediaTypes("application/x-guigu" ); } @Override public Person read (Class<? extends Person> clazz, HttpInputMessage inputMessage) throws IOException, HttpMessageNotReadableException { return null ; } @Override public void write (Person person, MediaType contentType, HttpOutputMessage outputMessage) throws IOException, HttpMessageNotWritableException { String data = person.getUserName()+";" +person.getAge()+";" +person.getBirth(); OutputStream body = outputMessage.getBody(); body.write(data.getBytes()); } }
1 2 3 4 5 6 7 8 9 10 11 12 13 14 15 16 17 18 19 20 21 22 23 24 25 26 27 28 29 30 import java.util.Date;@Controller public class ResponseTestController { @ResponseBody @GetMapping(value = "/test/person") public Person getPerson () { Person person = new Person (); person.setAge(28 ); person.setBirth(new Date ()); person.setUserName("zhangsan" ); return person; } }
用Postman发送/test/person(请求头Accept:application/x-guigu),将返回自定义协议数据的写出。
42、响应处理-【源码分析】-浏览器与PostMan内容协商完全适配 假设你想基于自定义请求参数的自定义内容协商功能。
换句话,在地址栏输入http://localhost:8080/test/person?format=gg返回数据,跟http://localhost:8080/test/person且请求头参数Accept:application/x-guigu的返回自定义协议数据的一致。
1 2 3 4 5 6 7 8 9 10 11 12 13 14 15 16 17 18 19 20 21 22 23 24 25 26 27 28 29 30 31 32 33 34 35 @Configuration(proxyBeanMethods = false) public class WebConfig { @Bean public WebMvcConfigurer webMvcConfigurer () { return new WebMvcConfigurer () { @Override public void configureContentNegotiation (ContentNegotiationConfigurer configurer) { Map<String, MediaType> mediaTypes = new HashMap <>(); mediaTypes.put("json" ,MediaType.APPLICATION_JSON); mediaTypes.put("xml" ,MediaType.APPLICATION_XML); mediaTypes.put("gg" ,MediaType.parseMediaType("application/x-guigu" )); ParameterContentNegotiationStrategy parameterStrategy = new ParameterContentNegotiationStrategy (mediaTypes); HeaderContentNegotiationStrategy headeStrategy = new HeaderContentNegotiationStrategy (); configurer.strategies(Arrays.asList(parameterStrategy, headeStrategy)); } } } ... }
日后开发要注意,有可能我们添加的自定义的功能会覆盖默认很多功能,导致一些默认的功能失效。
43、视图解析-Thymeleaf初体验
Thymeleaf is a modern server-side Java template engine for both web and standalone environments.
Thymeleaf’s main goal is to bring elegant natural templates to your development workflow — HTML that can be correctly displayed in browsers and also work as static prototypes, allowing for stronger collaboration in development teams.
With modules for Spring Framework, a host of integrations with your favourite tools, and the ability to plug in your own functionality, Thymeleaf is ideal for modern-day HTML5 JVM web development — although there is much more it can do.——Link
Thymeleaf官方文档
thymeleaf使用 引入Starter 1 2 3 4 <dependency > <groupId > org.springframework.boot</groupId > <artifactId > spring-boot-starter-thymeleaf</artifactId > </dependency >
自动配置好了thymeleaf 1 2 3 4 5 6 7 @Configuration(proxyBeanMethods = false) @EnableConfigurationProperties(ThymeleafProperties.class) @ConditionalOnClass({ TemplateMode.class, SpringTemplateEngine.class }) @AutoConfigureAfter({ WebMvcAutoConfiguration.class, WebFluxAutoConfiguration.class }) public class ThymeleafAutoConfiguration { ... }
自动配好的策略
所有thymeleaf的配置值都在 ThymeleafProperties
配置好了 SpringTemplateEngine
配好了 ThymeleafViewResolver
我们只需要直接开发页面
1 2 public static final String DEFAULT_PREFIX = "classpath:/templates/" ;public static final String DEFAULT_SUFFIX = ".html" ;
编写一个控制层:
1 2 3 4 5 6 7 8 9 10 @Controller public class ViewTestController { @GetMapping("/hello") public String hello (Model model) { model.addAttribute("msg" ,"一定要大力发展工业文化" ); model.addAttribute("link" ,"http://www.baidu.com" ); return "success" ; } }
/templates/success.html:
1 2 3 4 5 6 7 8 9 10 11 12 13 14 <!DOCTYPE html > <html lang ="en" xmlns:th ="http://www.thymeleaf.org" > <head > <meta charset ="UTF-8" > <title > Title</title > </head > <body > <h1 th:text ="${msg}" > nice</h1 > <h2 > <a href ="www.baidu.com" th:href ="${link}" > 去百度</a > <br /> <a href ="www.google.com" th:href ="@{/link}" > 去百度</a > </h2 > </body > </html >
1 2 3 server: servlet: context-path: /app
这个设置后,URL要插入/app, 如http://localhost:8080/app/hello.html。
基本语法 表达式
表达式名字
语法
用途
变量取值
${…}
获取请求域、session域、对象等值
选择变量
*{…}
获取上下文对象值
消息
#{…}
获取国际化等值
链接
@{…}
生成链接
片段表达式
~{…}
jsp:include 作用,引入公共页面片段
字面量
文本值: ‘one text’ , ‘Another one!’ ,…
数字: 0 , 34 , 3.0 , 12.3 ,…
布尔值: true , false
空值: null
变量: one,two,…. 变量不能有空格
文本操作
字符串拼接: +
变量替换: |The name is ${name}|
数学运算
布尔运算
运算符: and , or
一元运算: ! , not
比较运算
比较: > , <** **,** **>= , <= ( gt , lt , ge , le )
等式: == , != ( eq , ne )
条件运算
If-then: (if) ? (then)
If-then-else: (if) ? (then) : (else)
Default: (value) ?: (defaultvalue)
特殊操作
设置属性值-th:attr
1 2 3 4 5 6 <form action ="subscribe.html" th:attr ="action=@{/subscribe}" > <fieldset > <input type ="text" name ="email" /> <input type ="submit" value ="Subscribe!" th:attr ="value=#{subscribe.submit}" /> </fieldset > </form >
1 2 <img src ="../../images/gtvglogo.png" th:attr ="src=@{/images/gtvglogo.png},title=#{logo},alt=#{logo}" />
官方文档 - 5 Setting Attribute Values
迭代 1 2 3 4 5 <tr th:each ="prod : ${prods}" > <td th:text ="${prod.name}" > Onions</td > <td th:text ="${prod.price}" > 2.41</td > <td th:text ="${prod.inStock}? #{true} : #{false}" > yes</td > </tr >
1 2 3 4 5 <tr th:each ="prod,iterStat : ${prods}" th:class ="${iterStat.odd}? 'odd'" > <td th:text ="${prod.name}" > Onions</td > <td th:text ="${prod.price}" > 2.41</td > <td th:text ="${prod.inStock}? #{true} : #{false}" > yes</td > </tr >
条件运算 1 2 3 <a href ="comments.html" th:href ="@{/product/comments(prodId=${prod.id})}" th:if ="${not #lists.isEmpty(prod.comments)}" > view</a >
1 2 3 4 5 <div th:switch ="${user.role}" > <p th:case ="'admin'" > User is an administrator</p > <p th:case ="#{roles.manager}" > User is a manager</p > <p th:case ="*" > User is some other thing</p > </div >
属性优先级
Order
Feature
Attributes
1
Fragment inclusion
th:insert th:replace
2
Fragment iteration
th:each
3
Conditional evaluation
th:if th:unless th:switch th:case
4
Local variable definition
th:object th:with
5
General attribute modification
th:attr th:attrprepend th:attrappend
6
Specific attribute modification
th:value th:href th:src ...
7
Text (tag body modification)
th:text th:utext
8
Fragment specification
th:fragment
9
Fragment removal
th:remove
官方文档 - 10 Attribute Precedence